

The Assessment Centre feature gives you with the ability to organise comprehensive assessment schedules encompassing multiple events.
Building upon the functionalities of our Interview scheduling tool, this feature enables you to seamlessly link slots together. This means you can efficiently plan the schedules for both candidates and assessors, ensuring well-coordinated assessment days.
Example use cases:
- Day with multiple types of assessment - Plan a comprehensive schedule where candidates participate in various assessments, including an introductory presentation, group exercises and one-on-one interviews.
- Multiple interview day - Organise a day where a candidate engages in separate interviews with three different heads of departments.
Using the Interview tool for assessments
Setting up an Assessment Centre schedule may requires some initial effort as you have to map out each candidate’s day. If you only need to record the start and end times of candidates' days and don’t require detailed tracking throughout the day, consider using the Interview scheduling feature instead. For instance, if all candidates are starting at the same time, you could create one slot containing all the candidates.
STEP 1: INITIATE THE PROCESS OF CREATING AN ASSESSMENT CENTRE
- From the left-hand menu, go to Interviews > Create Assessment Centre.
- You will then be directed to a new page where you enter your assessment centre’s properties.
STEP 2: INPUT ASSESSMENT CENTRE PROPERTIES
The fields on the Create Assessment Centre page mirror those on the Create Interview page, with the addition of the 'Location Description' field. This field provides candidates with a detailed description of the address and location.
For a comprehensive description of all other fields, please refer to the Interview Properties guide.
After filling out all mandatory fields, click 'Create' to save the assessment to the system. You will then be directed to the Assessment Schedule summary page.
Save time by creating templates: See our guide to Creating Interview Templates.
STEP 3: CREATE ASSESSMENT CENTRE SCHEDULE
Overview
Once you have completed the Assessment Centre Properties, you should create the schedule.
There are three essential components to an Assessment Centre schedule:
- Streams – You can have several different streams at an assessment running in parallel. Streams are usually different rooms or activities at the assessment centre. For example, candidates may be interviewed by three different people in three different rooms. This schedule would therefore require three different streams.
- Slots – Once you have created a stream, you can add time slots to the stream. If you have a group interview or a presentation, you can allow multiple candidates to book into the same slot. You will be asked to tag an interviewer to your slots and you can then send them a calendar notification.
- Candidate itineraries – Once you have created your streams and attached slots, you should then link the slots together to create the itineraries for candidates to book into. For instance, a candidate itinerary could be an interview at Desk 1 at 9 am, a presentation at Desk 2 at 9.30 am, and a group exercise at Desk 3 at 10am.
Add Streams
- Select the date in your interview’s calendar to add slots to.
- Go to the Schedule tab.
- Select Add Stream.
- In the pop-up box, enter the Title of the new stream. This could be a room or an exercise.
- Click Create Stream and the new stream will now be added to the schedule.

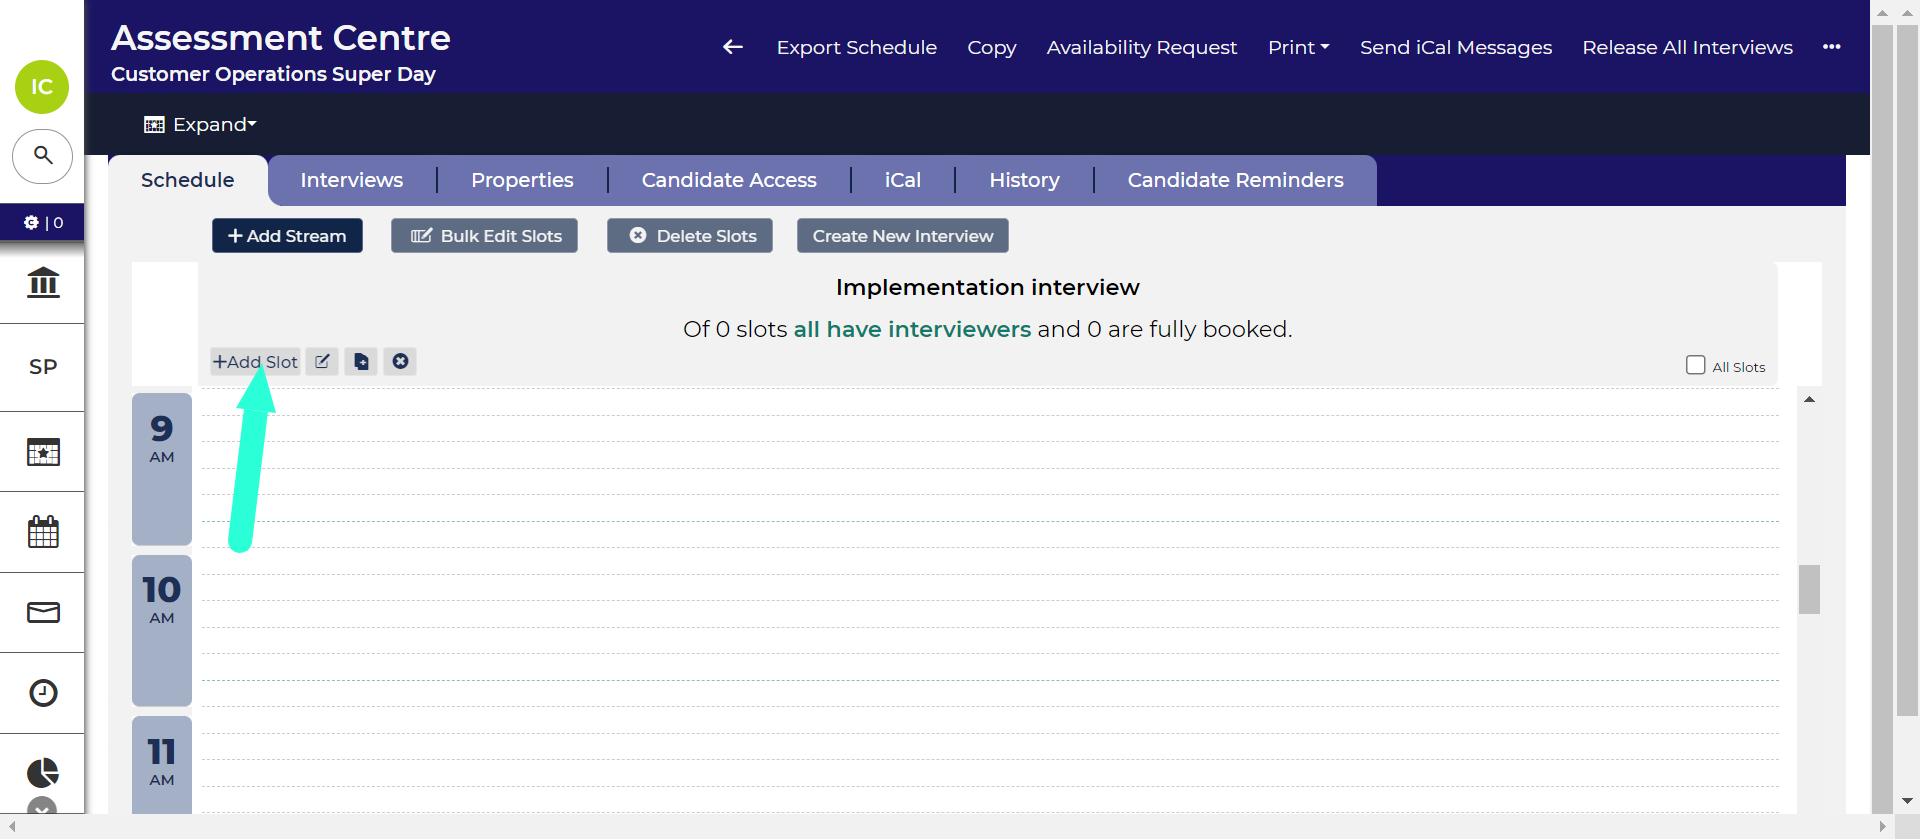
Add Slots to Streams
- Click on the Add Slots button in the Stream’s column heading.
- Complete the fields in the ‘Create Slot’ pop-up. Refer to the following guide for a description of each field: Add Interview Slot form
- Click Create Slot.
Copy Streams: To create a stream with similar slots to an existing one, use the ‘Copy slots / stream’ icon  . This feature allows you to selectively copy aspects of the stream to streamline the process.
Link slots together to create candidate itineraries
After adding slots to your stream, the next step is to link them together to form candidate itineraries.
Examples of itineraries:
- Company presentation > Group interview > 1-on-1 interview.
- Interview Desk 1 > Interview Desk 2 > Interview Desk 3.
To create an itinerary:
- Go to the Schedule tab.
- Click the Create New Interview button.

‘Create Interview’ button. - Select the slots that you would like to link together to form an itinerary:
- Available slots will be highlighted in blue. This will either mean that the slot is not attached to an existing itinerary or the slot has multiple candidate slots available. If a slot is full, it will be greyed out.
- Once you select a slot, it will be highlighted in green and all the other slots in that stream will be greyed out.
- You cannot link together slots from the same stream as candidates should not attend the same interview twice.
- Once you have selected the slots that form the itinerary, click the Save New Interview button. The information in the slots that you selected will update to confirm the itinerary that they are now tagged to.
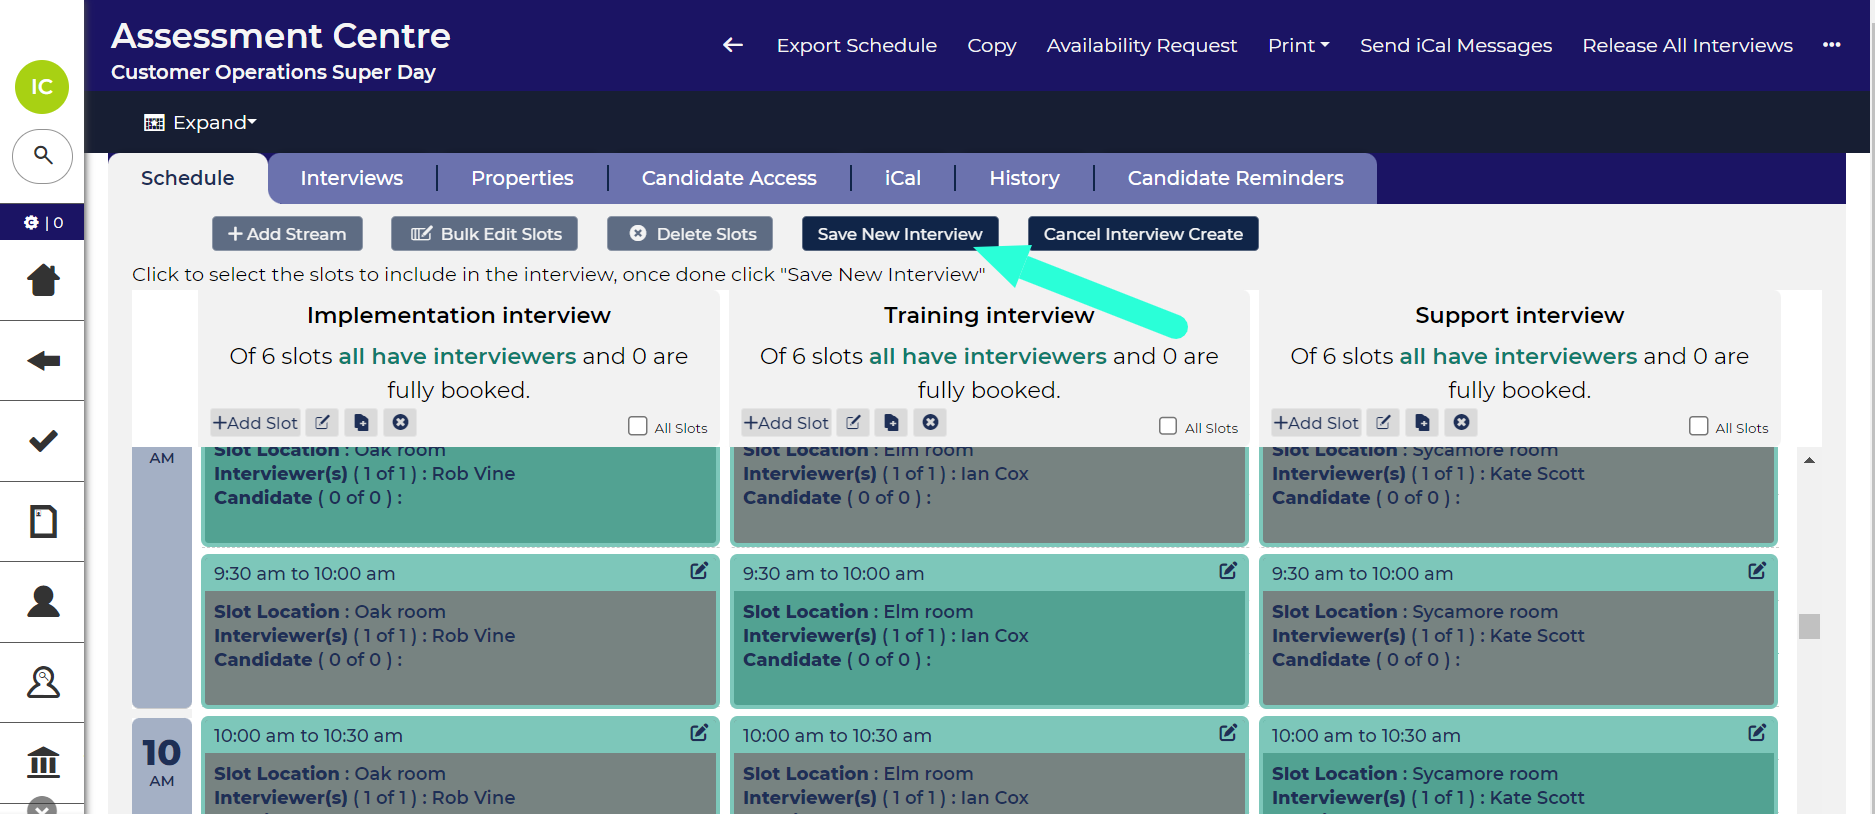
‘Save Interview’ button. -
Repeat this process until there is a sufficient number of itineraries for the number of candidates that you intend to invite to the Assessment Centre.
- You can check the itineraries you have created by clicking on the Interviews tab.
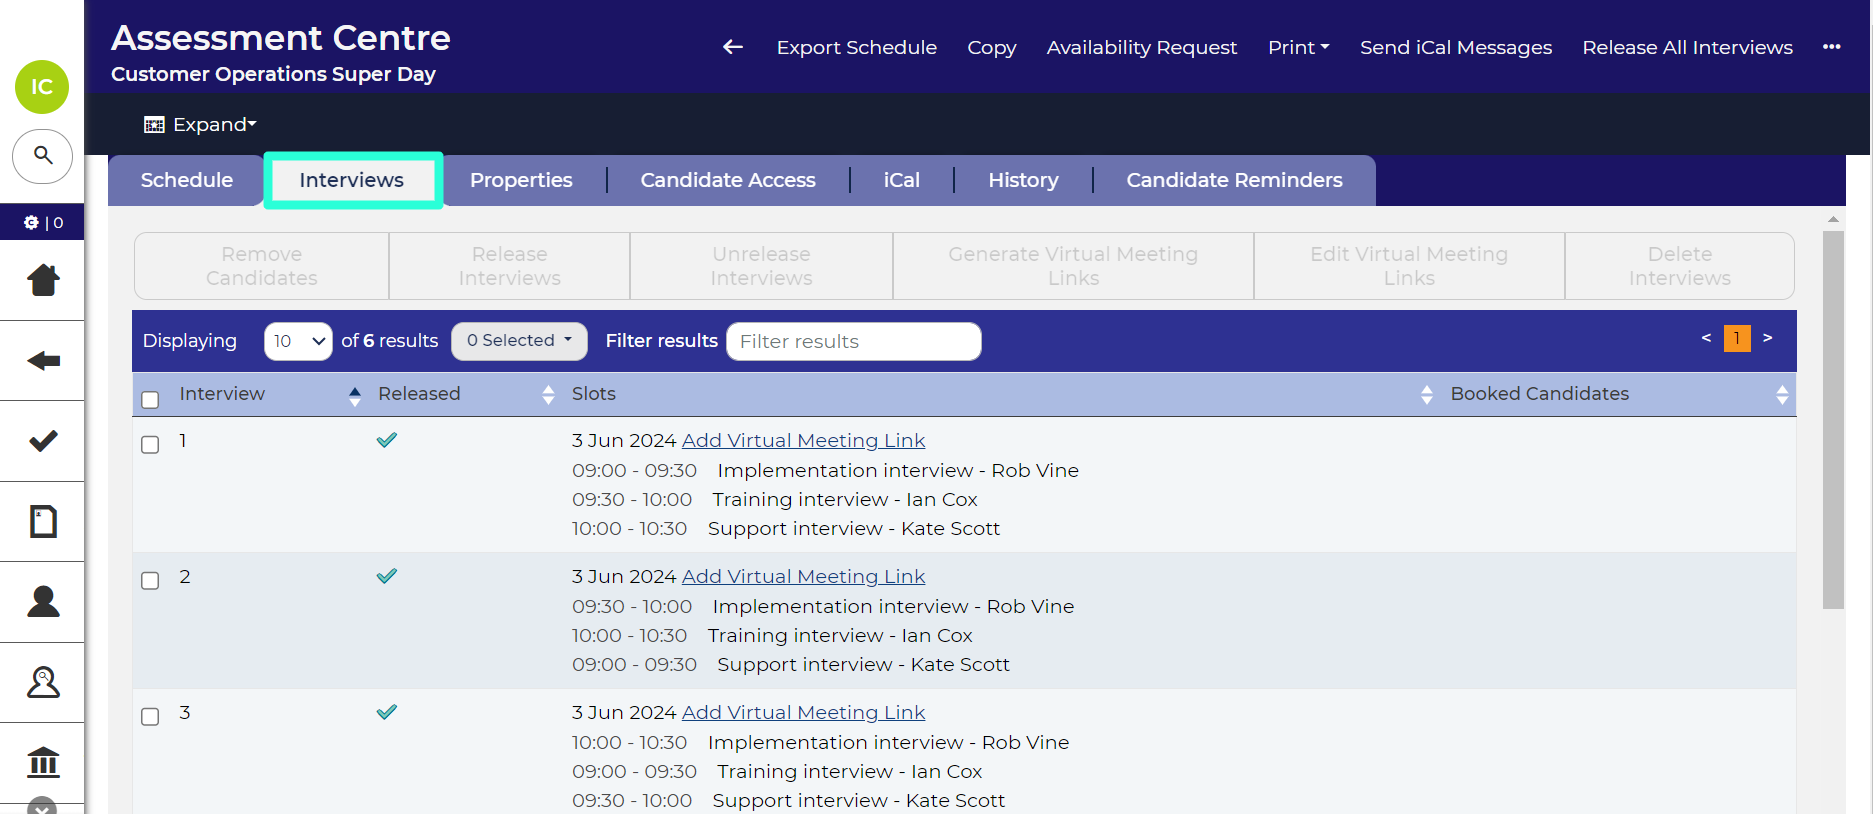
The ‘Interviews’ tab shows all candidate itineraries.
Itineraries required for candidate bookings: If you have not created any itineraries, candidates will not be able to book into your Assessment Centre.
Copying a day
Use this option if the schedule on the additional day is the same or similar to an existing day.
- Use the calendar at the top of the page to navigate to the day that you want to copy. The current day you are viewing is highlighted in turquoise and any other days with slots attached to them are highlighted in grey.
- Click the Copy Day button, which is found below the calendar.
- Select the day from the calendar that you want to copy to.
- A confirmation box will appear, click OK to confirm. You will be taken to the scheduled tab for the copied day.
- The itineraries will be designated as ‘unreleased’. The next step is to release the itineraries, as described in the section below.
Releasing itineraries
Any itineraries created by copying, whether that be by copying a day, an entire schedule or from a template, are initially set as ‘unreleased’. This is a safety measure to ensure that you don't accidentally make itineraries available you didn't intend to.
To release itineraries on a specific day:
- From the calendar, at the top of your schedule, select the date containing the itineraries you’d like to release. The date highlighted in turquoise is the current date you are viewing and the dates highlighted in grey are all other dates containing slots.
- Go to the Interviews tab.
- Select the itineraries to release using the checkboxes in the first column. You can select all slots on the day by clicking the checkbox in the column header.
- Click the Release Interview button at the top of the tab.
Release All Interviews: You can release all the itineraries attached to a schedule by clicking the ‘Release All Interviews’ button in your Interview Schedule’s toolbar.
STEP 4: ASSIGN CANDIDATE ACCESS
After creating your assessment schedule, you should link opportunities to it. This can be accomplished through the Candidate Access tab. The process mirrors that of assigning opportunities to interview schedules; please refer to the Assigning Candidate Access to schedules guide for detailed instructions.
Once completed, candidates from those opportunities can be invited to book into the schedule.
SAVE TIME BY USING TEMPLATES OR COPYING
Creating the schedule for your assessment centre may take a little time, especially if there are many candidates attending, as you'll need to create an itinerary for each individual. However, if your assessment centres typically follow a similar format, you can streamline the process for future events. Once you've created the schedule once, you can either copy it or convert it into a template to use for upcoming assessment centres.
Please see below tips for using templates and creating by copying:
- Guide to creating templates - See our guide to Creating Assessment Centre Templates.
- Use the ‘Create From’ field - You will be able to select a template or existing schedule using the 'Create From' field when inputting the properties.
- Move Days: Copied itineraries begin on the date you select in the ‘Properties’ form. After completing the form, you can adjust the days using the 'Move Day' button located below the calendar.
- Release copied slots - Initially, all itineraries will be marked as 'unreleased.' You'll need to release the itineraries to make them accessible to candidates.
