

In this guide, we cover the process of adding interview schedules via the left-hand menu. By accessing the left-hand menu, you have the flexibility to create schedules either from a template or by copying an existing one.
Additionally, your system may offer the option to add interview schedules directly to your opportunity. This method is covered in detail in the following guide: Creating interview schedules (from opportunity method).
Ad-hoc interview tool: While setting up schedules only takes a few minutes, it probably won’t save time if there are only one or two candidates to be interviewed. In this scenario, you can use the ad-hoc interview tool to create slots on the fly.
STEP 1: INITIATE THE PROCESS
- From the left-hand menu, go to Interviews > Create Interview .
- You will then be directed to a new page where you enter your interview's properties.
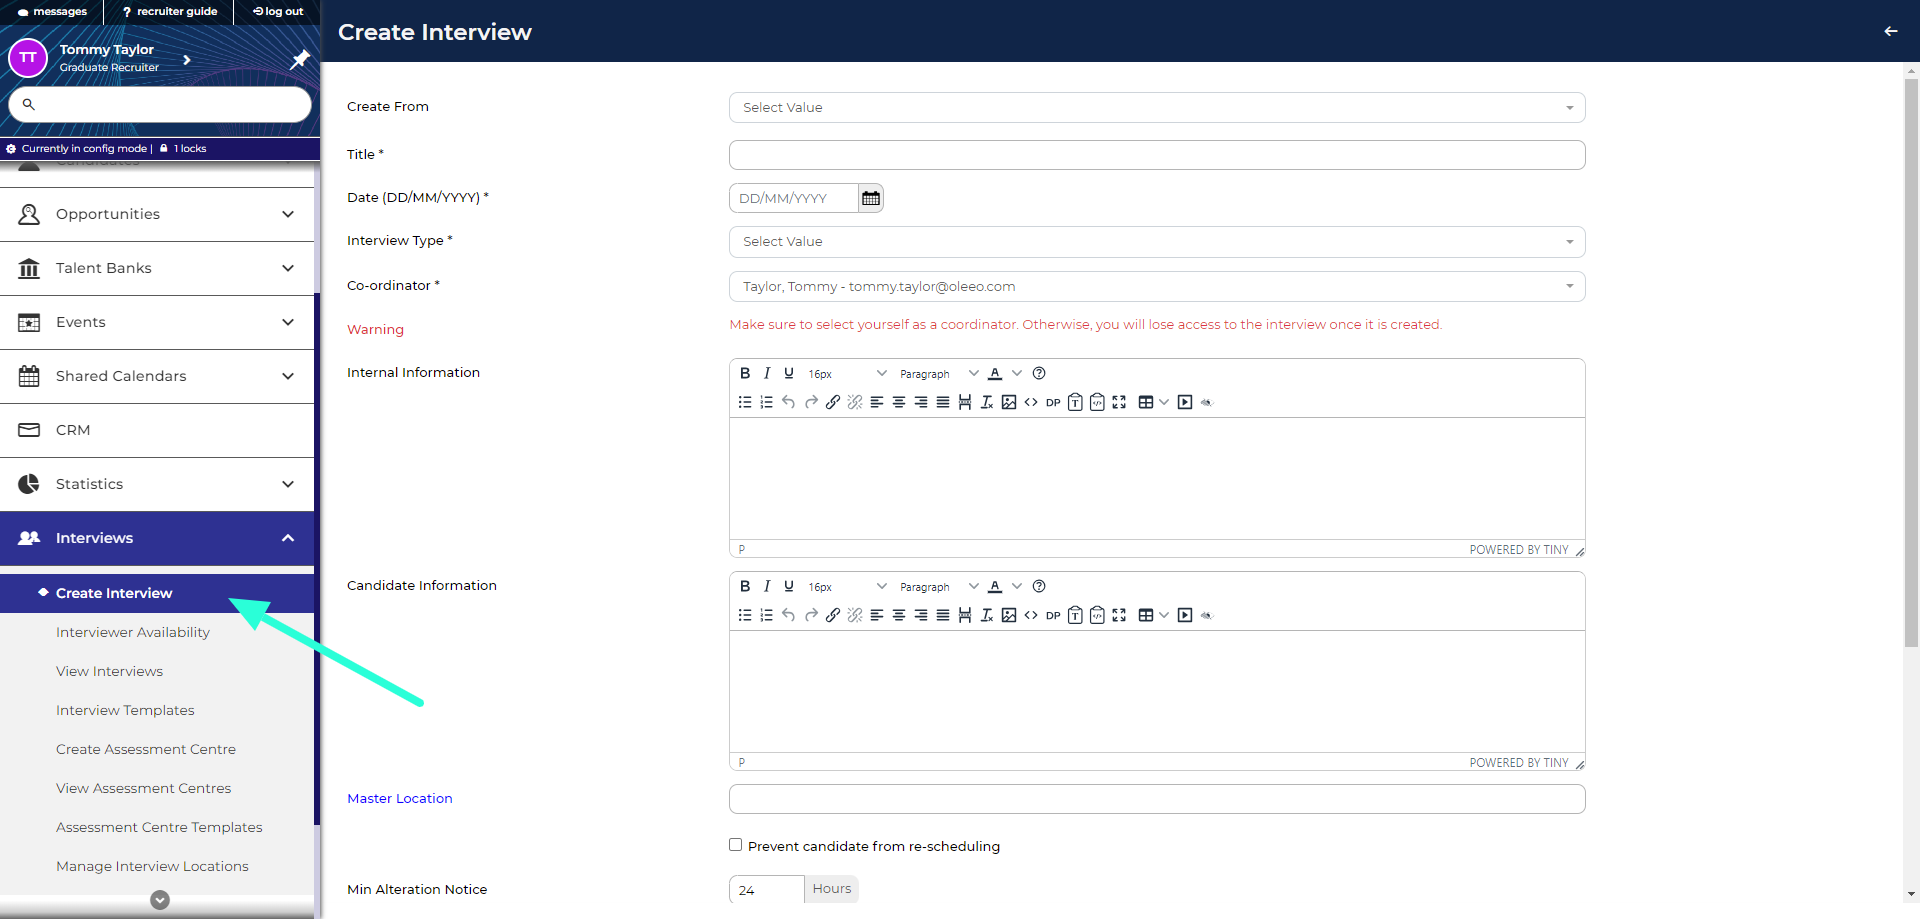
STEP 2: INPUT INTERVIEW PROPERTIES
On the Create Interview page, you will be asked to complete the following fields (all fields marked with * are mandatory):
- Create From:- The allows you to save time by copying the properties and time slots from an existing schedule or a template. This field will only appear if a schedule or template has been created on your system. Leave this field blank to enter all the details manually.
- Title* – Provide a descriptive name for the interview schedule, typically including the opportunity name and interview stage (e.g. “Project Manager - Round 1 Interview”). This will be visible to candidates.
- Date* – Select the date when the interview schedule will start. If the interview spans multiple days, you can add additional days once the schedule has been created.
- Interview Type* - Select what stage of the recruitment process this interview is for (e.g. First Round interview, Final Round Interview). Candidates will need to be in the corresponding invite status to book a slot of the schedule.
- Coordinator* – Typically, select yourself as the co-ordinator. Your system can be setup to send notifications to the co-ordinator when an interviewer declines a calendar invite.
- Internal (recruiter) Description – Use this field for internal notes relevant to the interview schedule. It's optional and can be left blank if not needed. Any text you enter here will be included in the interviewer printout.
- Candidate Description – This section provides important information to candidates, appearing on the booking confirmation screen and possibly in the confirmation email. Here, you can outline what candidates should prepare for, any items they need to bring, and details regarding the interview format. Tailor this information to ensure candidates are well-prepared for their upcoming interview.
- Master Location – Choose from available locations or manually add a new one using free text typing. This information will be visible to candidates.
- Prevent candidate from re-scheduling - Tick this checkbox if you want to restrict candidates from changing their selected slot. Note, this option may not be available if rescheduling is disabled on your system.
- Min Alteration Notice – Leaving this field blank allows candidates to book slots right up until the time of the interview. If you need time to prepare, enter the minimum notice required. For example, entering “24” will make empty slots unavailable less than 24 hours before the interview. Additionally, booked candidates will not be able to reschedule once they are within 24 hours of their interview.
- Time Zone – If your system is only used to recruit in one time zone, leave this as the system’s default time zone. If your system is used in multiple time zones, you should select the time zone where the interview is taking place. The time zone is visible to candidates.
- Time Format - Choose how the times of the interview slots will be displayed to candidates. You can choose between 24 and 12-hour formats.
- Feedback form - If unauthenticated interview feedback forms are enabled on your system, choose a feedback form here. These forms enable interviewers to provide feedback conveniently without the need to log in. They can simply click on a link provided in an email or calendar invite.
- Invite Email Template - Select the template that will be used to invite candidate to select a slot (a default interview invite email will be sent if this field is ignored).
- Booked Email Template - Select the template that will be sent to candidates when they select a slot (a default interview booking email will be sent if this field is ignored).
- Include Candidate CV/Résumé in Interviewer Calendar Requests - Interviewers can receive updated calendar invites (e.g. Outlook Calendar meeting invites) when a candidate books into a slot where they have been selected as an interviewer. If you do not want the calendar invite to include the candidate’s CV, deselect this checkbox.
Once you have completed all the mandatory fields, click Create. The interview will now be saved to the system and you will be taken to the Interview Schedule summary page.
Editing Properties: You can modify all the information entered during creation by accessing the Properties tab on the summary page after creation.
System admin: Managing the Master Location List
End users can add new locations by free text typing into the Master Location field.
System Admins can manage this list (e.g. delete locations or amend locations) from the Live environment by going to Interviews > Manage Interview Locations in the left-hand menu.
STEP 3: CREATE THE SCHEDULE
Adding slots to the current date
Once you have input the interview properties, you will be taken to the 'Schedule' tab. The current day will be the day you selected when completing the proprieties and it will be highlighted in turquoise in the calendar at the top of the page.
To add slots:
- Click Add Slot:
- Go to your interview’s ‘Schedule’ tab.
- Click the ‘Add Slot’ button at the top of the tab.
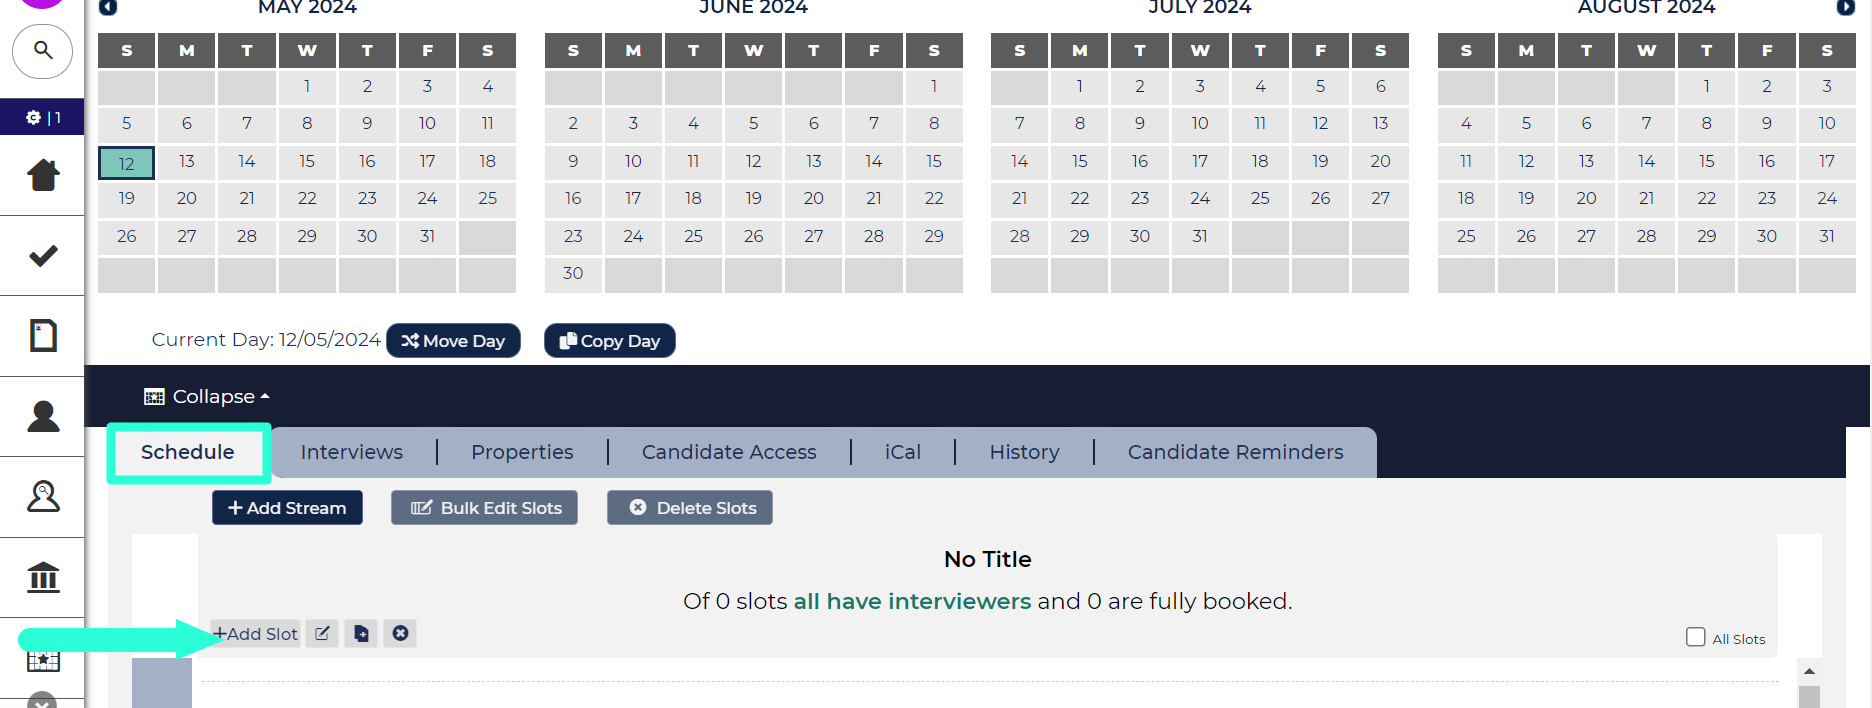
‘Add Slot’ button in the ‘Schedule’ tab.
- Complete the Add Interview Slot form:
- After clicking ‘Add Slot’, you will be presented with a short form to fill in the details for your timeslot(s):
- Slot Start Time* - Choose the start time for the interview slot. If you are entering a sequence of slots, select the start time for the first interview slot. You need to select the hour and minute.
- Slot Duration* - Enter the duration of the interview in minutes.
- Candidates Per Slot* - Determine the maximum number of candidates allowed in the time slot. For group interviews, specify the appropriate number of candidates per slot. Usually set to 1 for individual interviews.
- Add Multiple Slot Spaces - Check this box to create multiple slots on the selected date:
- Number of Slots* - Specify the total number of timeslots to create in the sequence. If you are adding slots for a full interview day, and you want to build in a lunch break, you might want to add the morning slots first and then enter the afternoon slots.
- Slot Spacing - Set the gap, in minutes, between each interview slot in this sequence. If there does not need to be a gap leave this field blank.
- Slot Location - Specify the exact location of the interview slots, for example the room number. This information will be visible to candidates once they have selected a slot. If it is a video interview, you could enter "Virtual" or specify the meeting technology that will be used.
- Send/Update Interview iCal Now -
- By selecting this option, a calendar invite will be promptly dispatched to the designated interviewer(s), ensuring that their schedules reflect the interview times.
- If you’d prefer to create the full schedule first, and then issue the iCals in one go at a later date, leave this checkbox blank and then click the ‘Send Calendar Update to Interviewer(s)’ toolbar button when you are ready.
- Your system can be configured to notify the coordinator via email if an interviewer declines the invitation.
- Interviewer(s) - These are the individuals conducting the interview. You can assign multiple interviewers as necessary, selecting from the list of users added to the system. If an interviewer is not available in the list, you may have the option to ‘Create New User’. In case this option is unavailable, seek assistance from a super user.
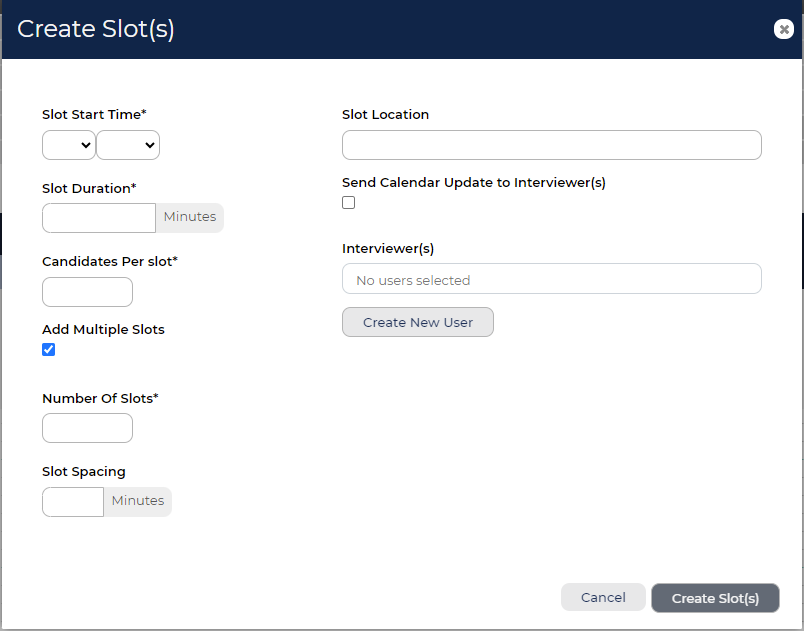
Create Slot(s) form.
- After clicking ‘Add Slot’, you will be presented with a short form to fill in the details for your timeslot(s):
- Click Create Slot(s):
- Once you have completed the details for your timeslot(s), click ‘Create Slot(s)’ to confirm the details.
- The timeslot(s) you have created will now appear in the ‘Schedule’ tab.
- To add additional slots on the same day, for example an afternoon session, click ‘Add Slot’ again.
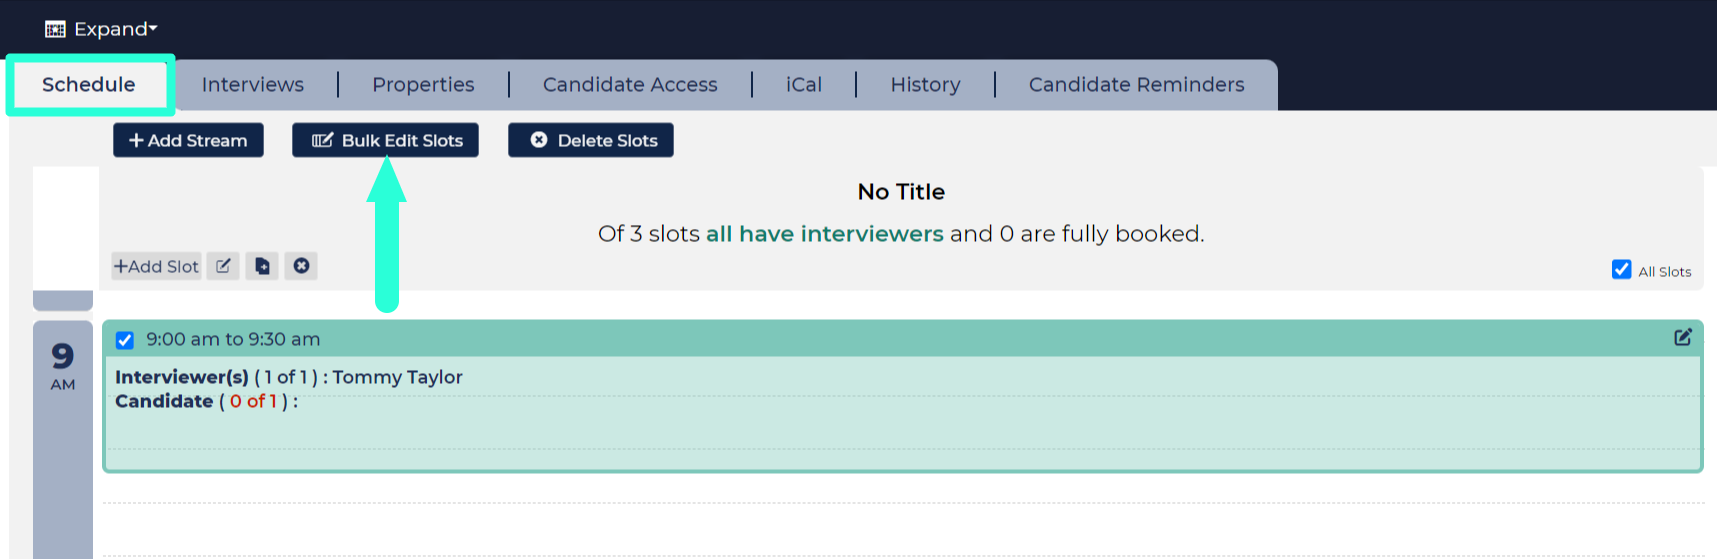
Bulk Edit Slot: It is possible to edit slots after they have been created using the ‘Bulk Edit Slots’ button. For example, you can allocate interviewers to slots at a later date.
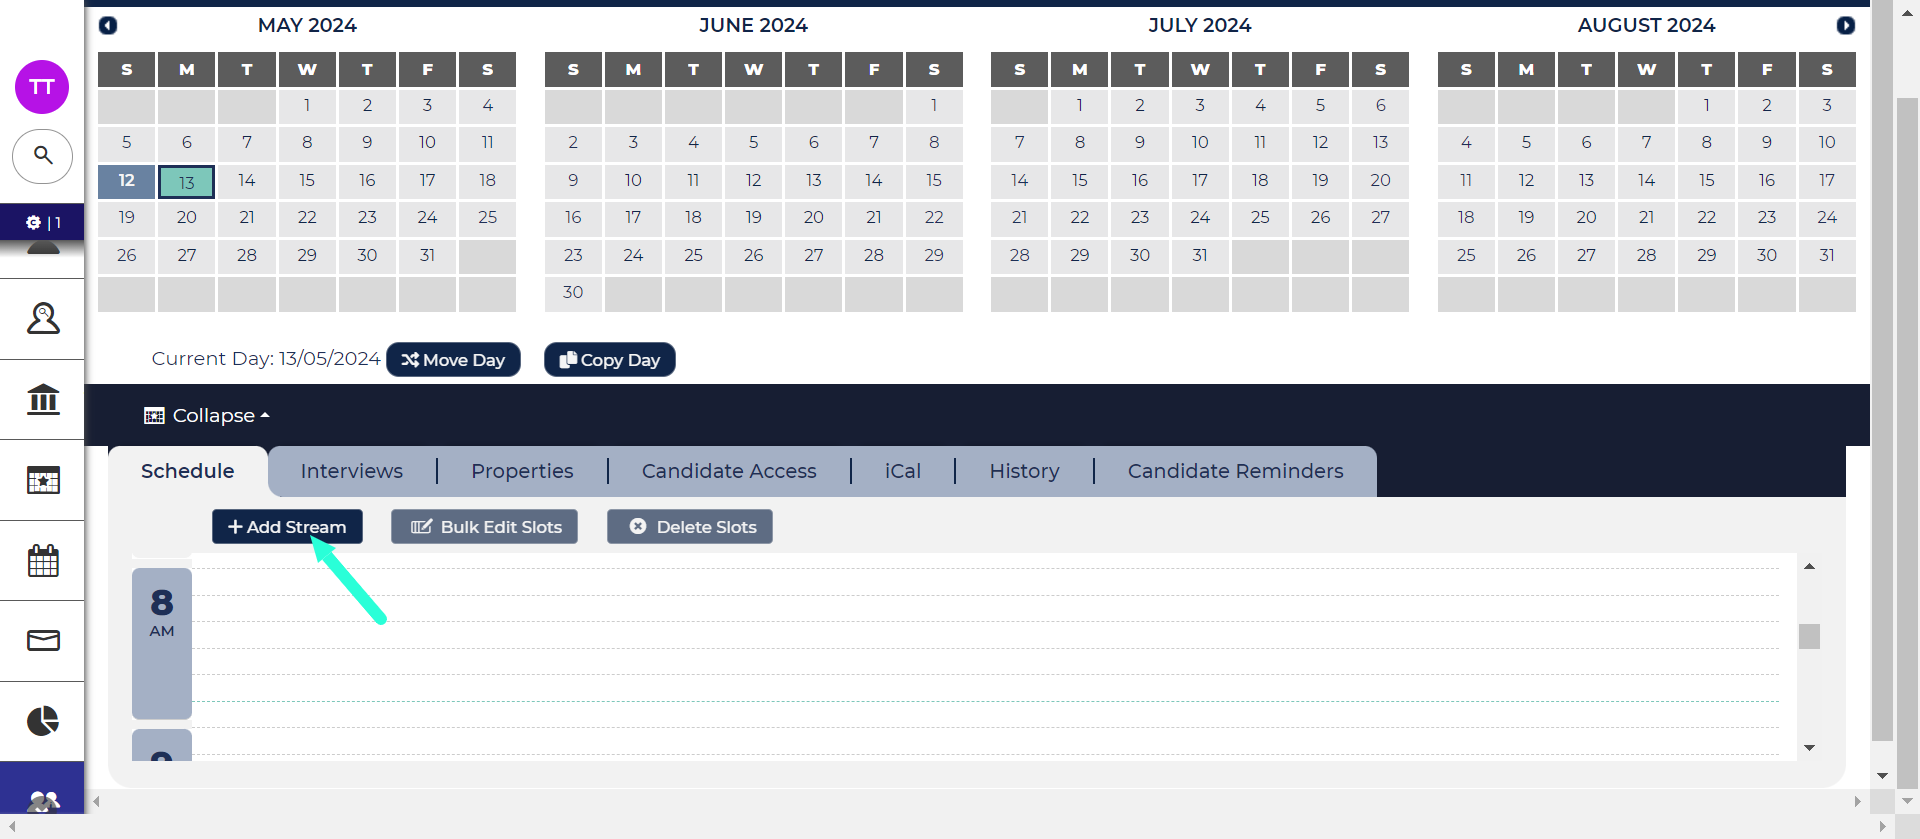
Adding Streams to a day
If you have two interview panels running in parallel and their slot times are the same or overlapping, you can create separate interview streams.
- Go to the Schedule tab.
- Select Add Stream.
- In the pop-up box, enter:
- Title (mandatory): This could be the name of the room or panel (e.g. “Panel 2”).
- Required Interviewers (optional): If this field is set it will be used to highlight slots that don’t have enough interviewers.
- Click Create Stream and the new stream will now be added to the schedule.
- Add slots as per the guidance above.
If candidates need to attend slots across multiple streams, convert your schedule to an Assessment Centre.
This allows you to select slots from different streams and create a single itinerary for each candidate.
To convert your interview schedule, go to the interview’s Properties tab and select the Assessment Centre checkbox.
For full instructions, see: Creating Assessment Centre Schedules
Manually adding slots to another day
- Select the date in your interview’s calendar to add slots to.
- Go to the Schedule tab.
- Select Add Stream, then (after entering your schedule’s title) Create Stream.
- Add slots as per the guidance above.
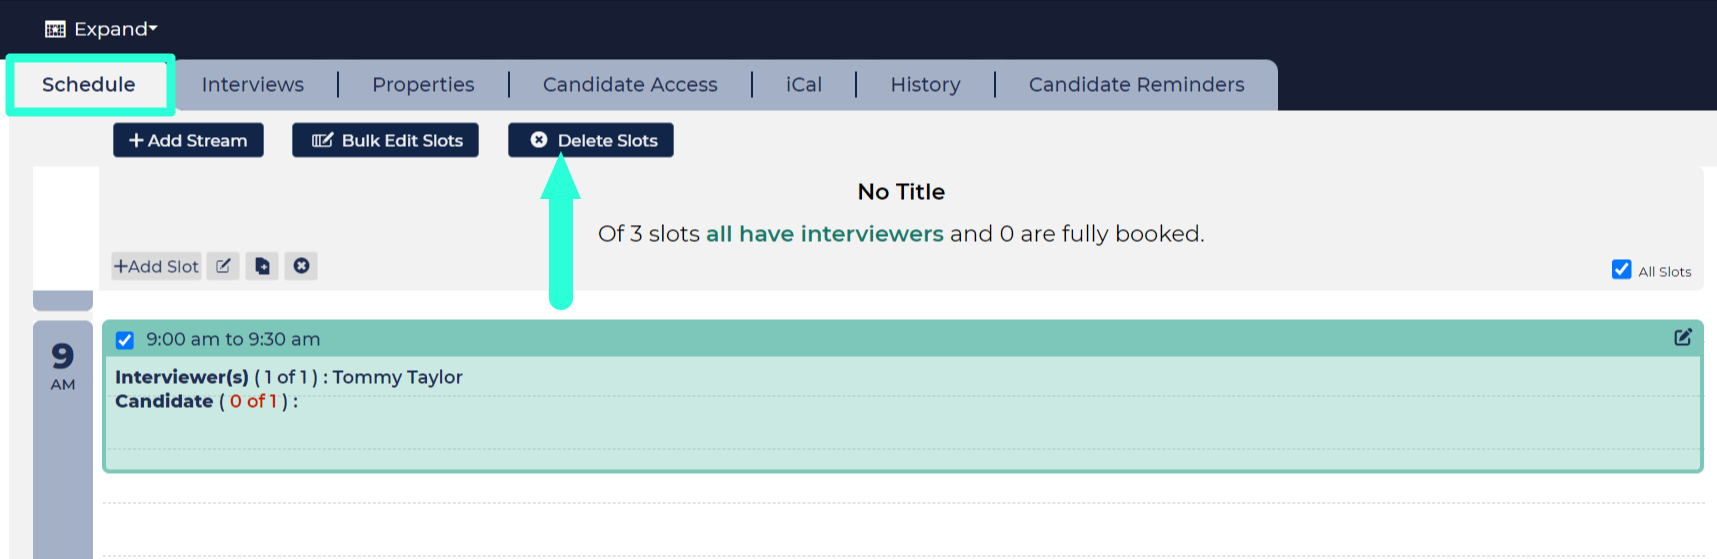
Deleting slots
- Go to the Schedule tab.
- Select the slots you want to delete:
- Select specific slots by selecting the checkbox in the top-left corner of the slot’s panel.
- Select All Slots by selecting the checkbox at the top-right of the tab.
- Click the Delete Slots button.
Cannot delete slots with candidates: You cannot delete slots that have candidates attached to them.
Editing slots
- Go to the Schedule tab.
- Select the slots you want to edit:
- Select specific slots by selecting the checkbox in the top-left corner of the slot’s panel.
- Select All Slots by selecting the checkbox at the top-right of the tab.
- Click the Bulk Edit Slots button.
- A blank Bulk Edit Slots form will open, complete the field that requires a change (e.g. add an interviewer) and click Submit.
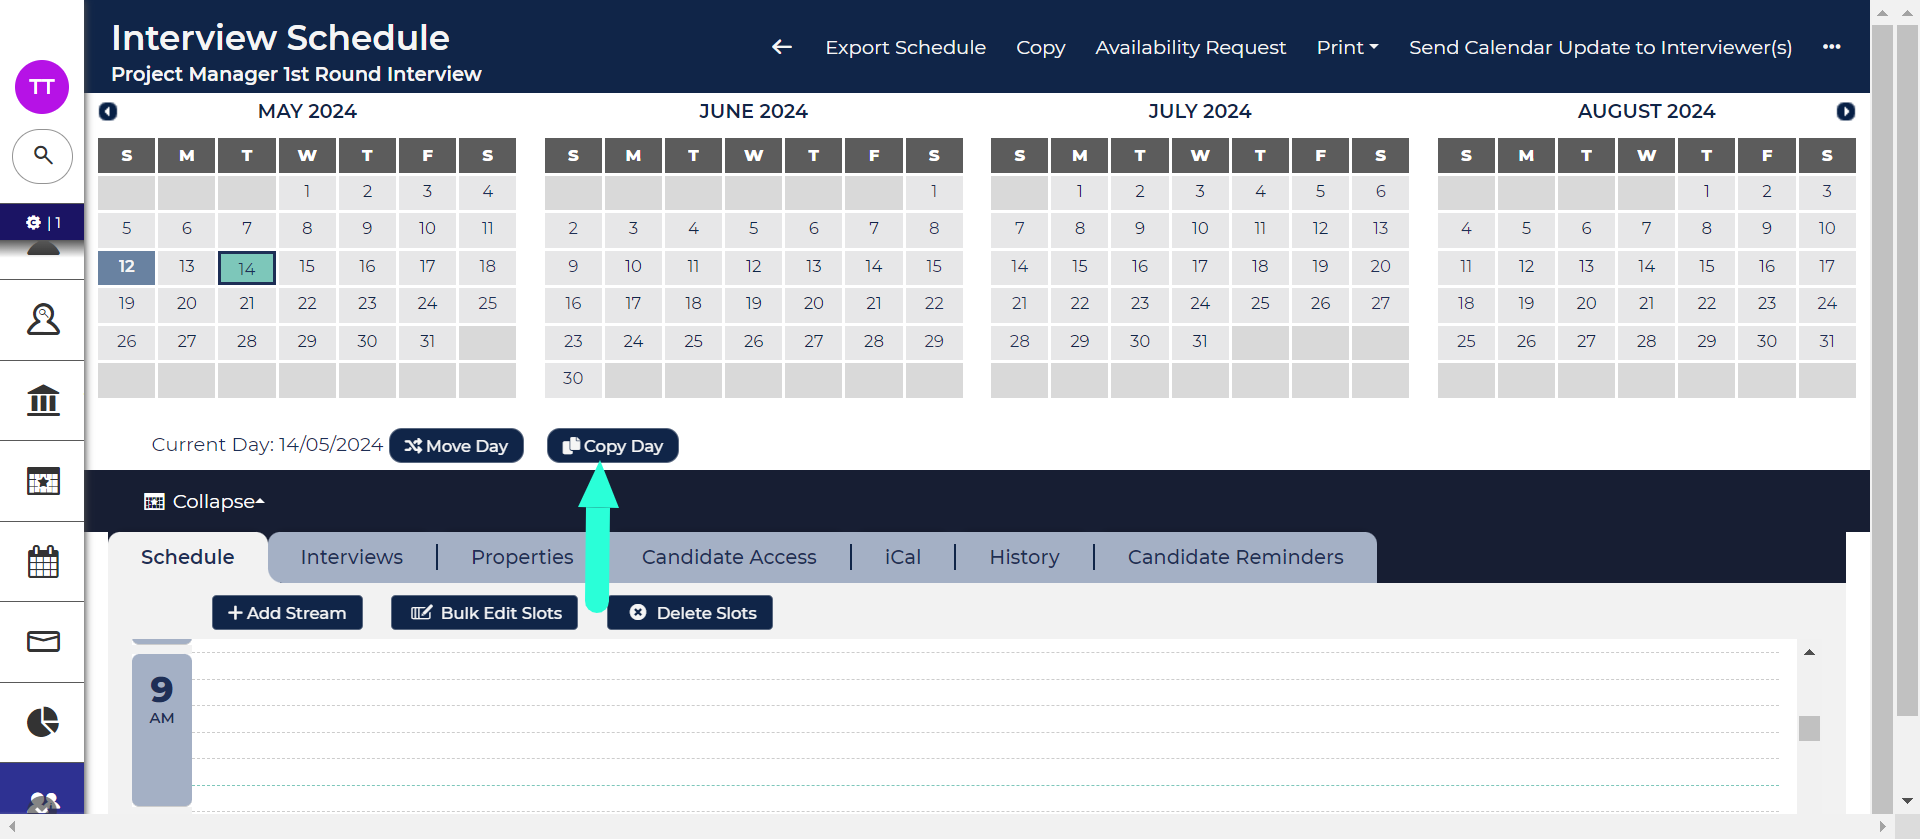
Copying a day
Use this option if the schedule on the additional day is the same or similar to an existing day.
- Use the calendar at the top of the page to navigate to the day that you want to copy. The current day you are viewing is highlighted in turquoise and any other days with slots attached to them are highlighted in grey.
- Click the Copy Day button, which is found below the calendar.
- Select the day from the calendar that you want to copy to.
- A confirmation box will appear, click OK to confirm. You will be taken to the scheduled tab for the copied day.
- The copied slots will all designated as ‘unreleased’. The next step is to release the slots, as described in the section below.
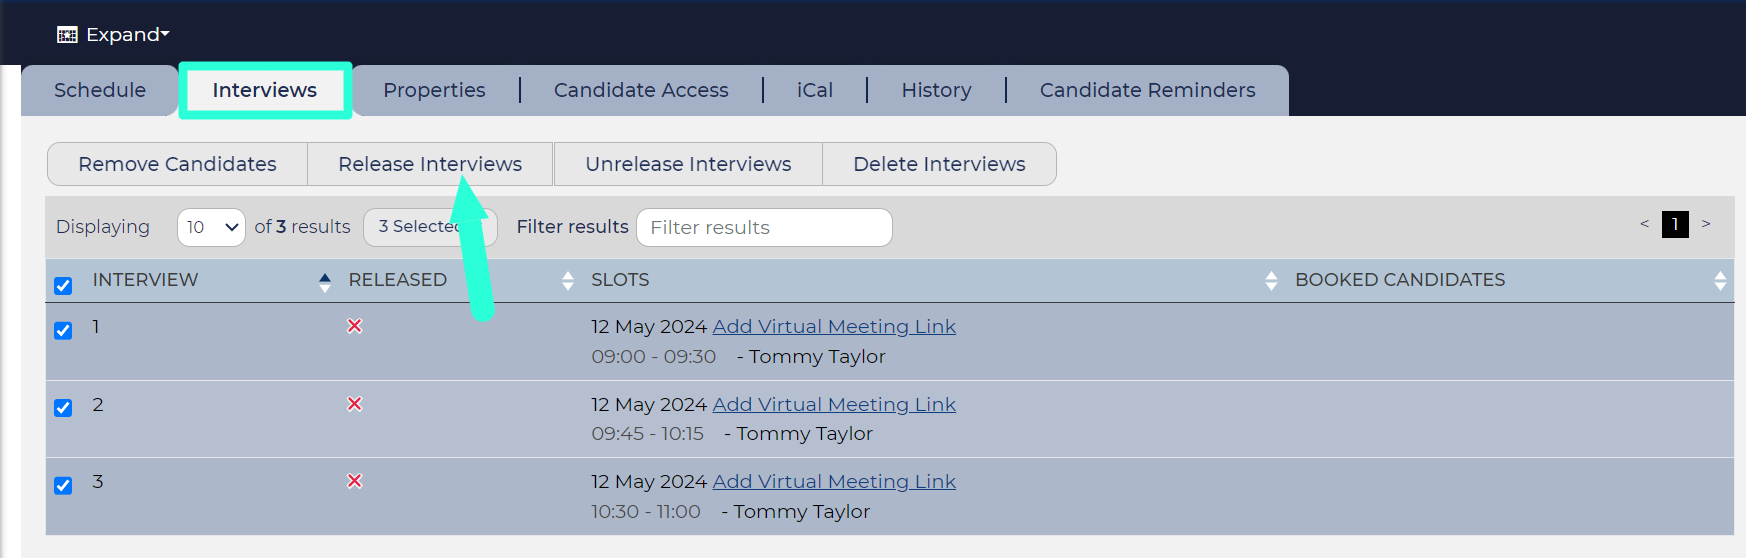
Releasing slots
Any slots created by copying, whether that be by copying a day, an entire schedule or from a template, are initially set as ‘unreleased’. This is a safety measure to ensure that you don't accidentally make slots available you didn't intend to.
To release slots on a specific day:
- From the calendar, at the top of your schedule, select the date containing the slots you’d like to release. The date highlighted in turquoise is the current date you are viewing and the dates highlighted in grey are all other dates containing slots.
- Go to the Interviews tab.
- Select the slots to release using the checkboxes in the first column. You can select all slots on the day by clicking the checkbox in the column header.
- Click the Release Interview button at the top of the tab.
Release All Interviews: You can release all the slots attached to a schedule by clicking the ‘Release All Interviews’ button in your Interview Schedule’s toolbar.
Moving days
If you've created your schedule from a template or by copying an existing one, the copied slots will commence on the date you specify in the 'Properties' form. If the schedule contains more than one day, you may want to move some of the days.
The current day selected in the interview's calendar will be highlighted in turquoise, while all other days containing slots will be highlighted in grey.
To move a day:
- Select the desired day from the calendar.
- Click the Move Day button located below the calendar.
- Choose the day in the calendar where you want to relocate the slots.
- Click OK to confirm. You will then be directed to the new day.
STEP 4: ASSIGN CANDIDATE ACCESS
Once you have created your interview schedule, you can assign Candidate Access.
This involves linking opportunities to the schedule. Once you have done this, you will be able to invite candidates from those opportunities to book into the interview.
To assign access:
- Click on the Candidate Access tab on the Interview Schedule’s page.
- Click the Add Opportunities button.
- In the pop-up box, select the opportunity that you would like to assign to the interview from the list. You can use the ‘Filter results’ box to narrow down the list.
- Click Add Selected Opportunities.
- You will be returned to the Candidate Access tab. The opportunities you selected will be added to the table.

SAVE TIME BY USING TEMPLATES OR COPYING
You can create a schedule by using a template or copying from an existing schedule. This action will copy both the properties and slots.
- Guide to creating templates - See our guide to Creating Interview Templates.
- Use the ‘Create From’ field - You will be able to select a template or existing schedule using the 'Create From' field when inputting the properties.
- Move Days: Copied slots begin on the date you select in the ‘Properties’ form. After completing the form, you can adjust the days using the 'Move Day' button located below the calendar.
- Release copied slots - Initially, all slots will be marked as 'unreleased.' You'll need to release the slots to make them accessible to candidates.
NEXT STEPS
