After creating your Interview Schedule or Assessment Centre Schedule, candidates can log in to the application centre and schedule a time.
There are 2 method for inviting candidates:
- Invite applications in bulk (recommended) - Our recommended approach is to bulk invite candidates from a list. This method ensures simultaneous communication with all candidates and streamlines the scheduling process.
- Invite individuals - Alternatively, you can individually invite candidates from the Application Summary page. This method is useful when interviewing a small number of candidates or if you want to send an invite immediately after screening.
INVITING CANDIDATES TO SELF-SCHEDULE IN BULK
- Load the applications selected for interview:
- From the left-hand menu, navigate to 'Opportunities' > 'Search'.
- In the list of opportunities, double-click on the opportunity.
- Inside the opportunity, go to its 'Applications' tab.
- Click on the total number next to the status that contains the applications. This might be called something like ‘Interview - Selected’ or ‘Selected for Assessment’.
- Select the applications to invite:
- You can select all applications on the page by clicking the button that says '0 Selected'
 and then choosing 'Select All'.
 - Alternatively, select specific applications from the list by single-clicking on their rows.
- You can select all applications on the page by clicking the button that says '0 Selected'
- Progress their status:
- In the toolbar at the top-right of the page, choose 'Status' > 'Progress Route'.
- On the 'Confirm Selection' page, verify that you've selected the correct applications.
- Click 'Confirm'.
- Choose the Interview Selection Method*.
- Auto Select (recommended) – Candidates can book into any schedule corresponding with their status in the Properties tab and their opportunity in the Candidate Access tab.
- Specific Interview – Candidates will only be able to book into the schedule(s) you select from the list. Use this option if you have created multiple schedules for your opportunity and want to allocate candidates to a specific schedule (e.g. allocate candidates to schedules based on where they live):
- Filter interview on type - Deselect this box to choose schedules that don't correspond to the candidates' statuses.
- Filter interviews on assigned access - Deselect this box to choose schedules that don't correspond to the candidates' opportunities.
- Compose the invite email:
- On the same page that you choose the Interview selection Method, you also compose the invite email.
- You can deselect the ‘Send Email’ checkbox if you do not wish to send the candidate an email.
- The Invite Email section contains the following field:
- Correspondence – In this dropdown, select the interview template that you would like to send to the candidates. The templates will contain instructions about how to book into an interview slot online.
- Email Subject – The subject will be taken from the email template that you select. This is a free text field and you are able to edit the text.
- Email Text – The email text will be taken from the email template that you select. You can edit the email text and also use the rich text editor to amend the formatting.
- Add Local File - Click to add an attachment.
- Preview the email:
- The invite email will contain dynamic elements that personalise the email for each candidate.
- If you made any changes to the email, click ‘Preview Email’ before sending.
- The preview will merge in the data for the first candidate that you selected.
- Confirm and send:
- Once you are happy with the invite email, click Confirm.
- The application will move to the invited status. This might be called something like “Interview - Invited”.
- The candidates will now be able to book into the schedule from their application centre.

INVITING A CANDIDATE TO SELF-SCHEDULE FROM THEIR APPLICATION SUMMARY
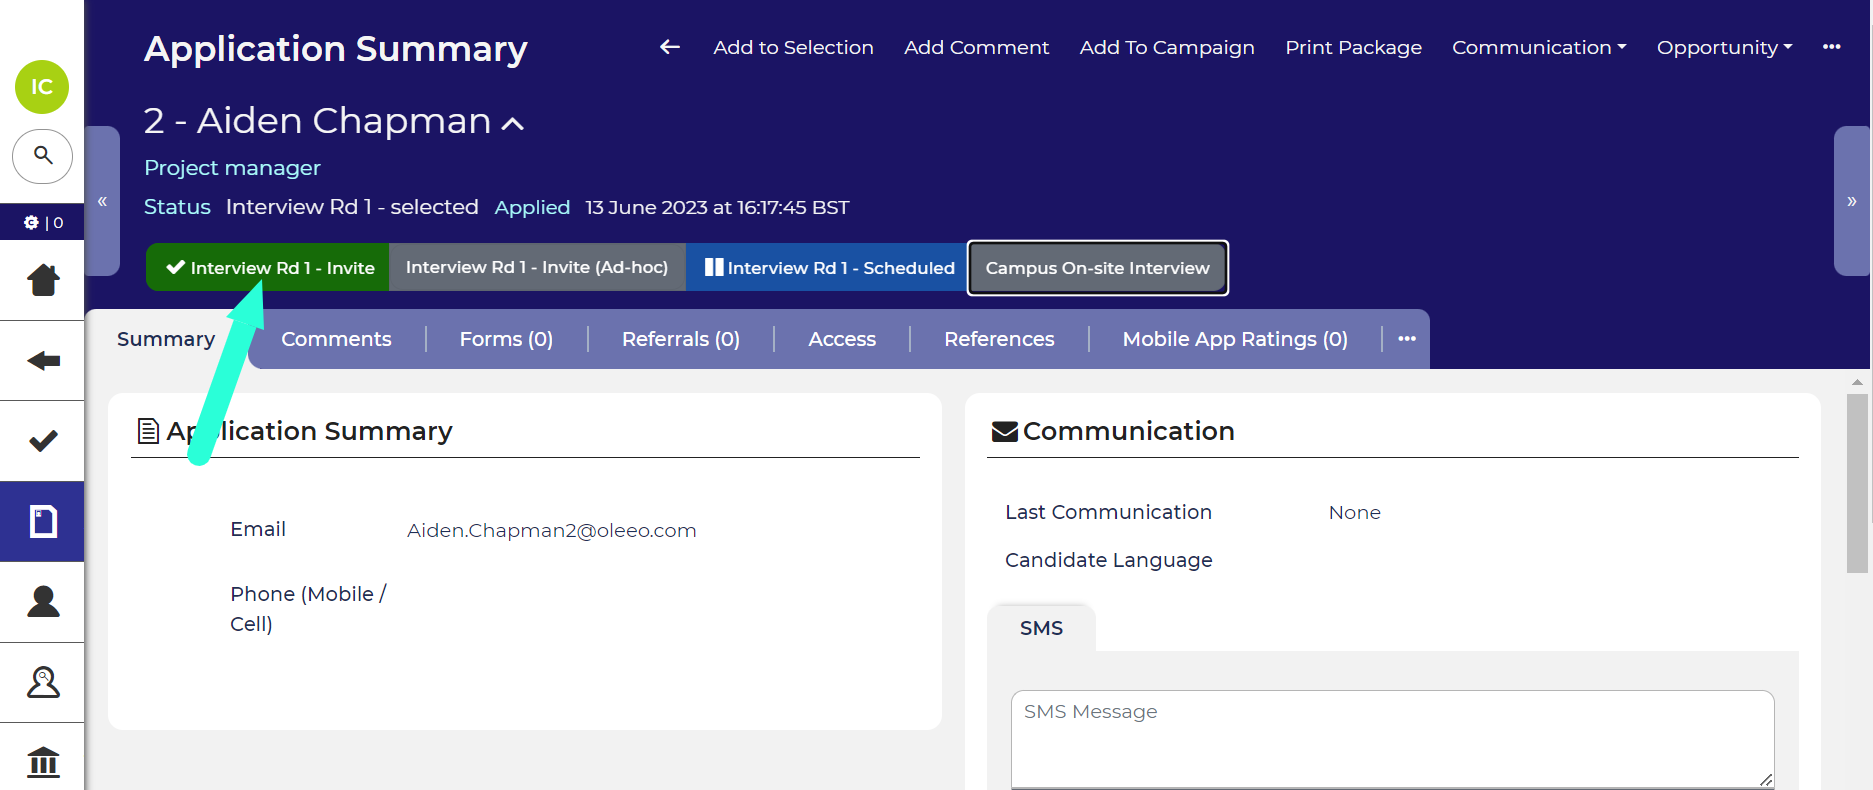
You can invite candidates directly from their Application Summary page, as long as they are in the correct status, for example 'Interview - Selected'.
The option to invite will appear among the action buttons located below their status.
Clicking this button will redirect you to the same page used for bulk inviting applications. Here, you can choose the selection method and compose the invitation email.
HOW CANDIDATES SELF-SCHEDULE
- Receive Invitation Email:
- Candidates are placed in the invite status and receive an invitation email containing a link to their application centre.
- Login:
- Upon logging in, candidates see a button to access the interview schedules.
- Review Interview Details and select a slot:
- Above the available slots, candidates view details such as interview title, master location, and candidate description.
- Candidates choose an available slot from a dropdown, excluding those within the minimum alteration notice period.
- Confirmation email sent:
- After selecting a slot, candidates move to the scheduled status and receive a confirmation email confirming the interview date and time.
- Depending on system configuration, additional details like master location, interviewer details, or candidate description may be included.
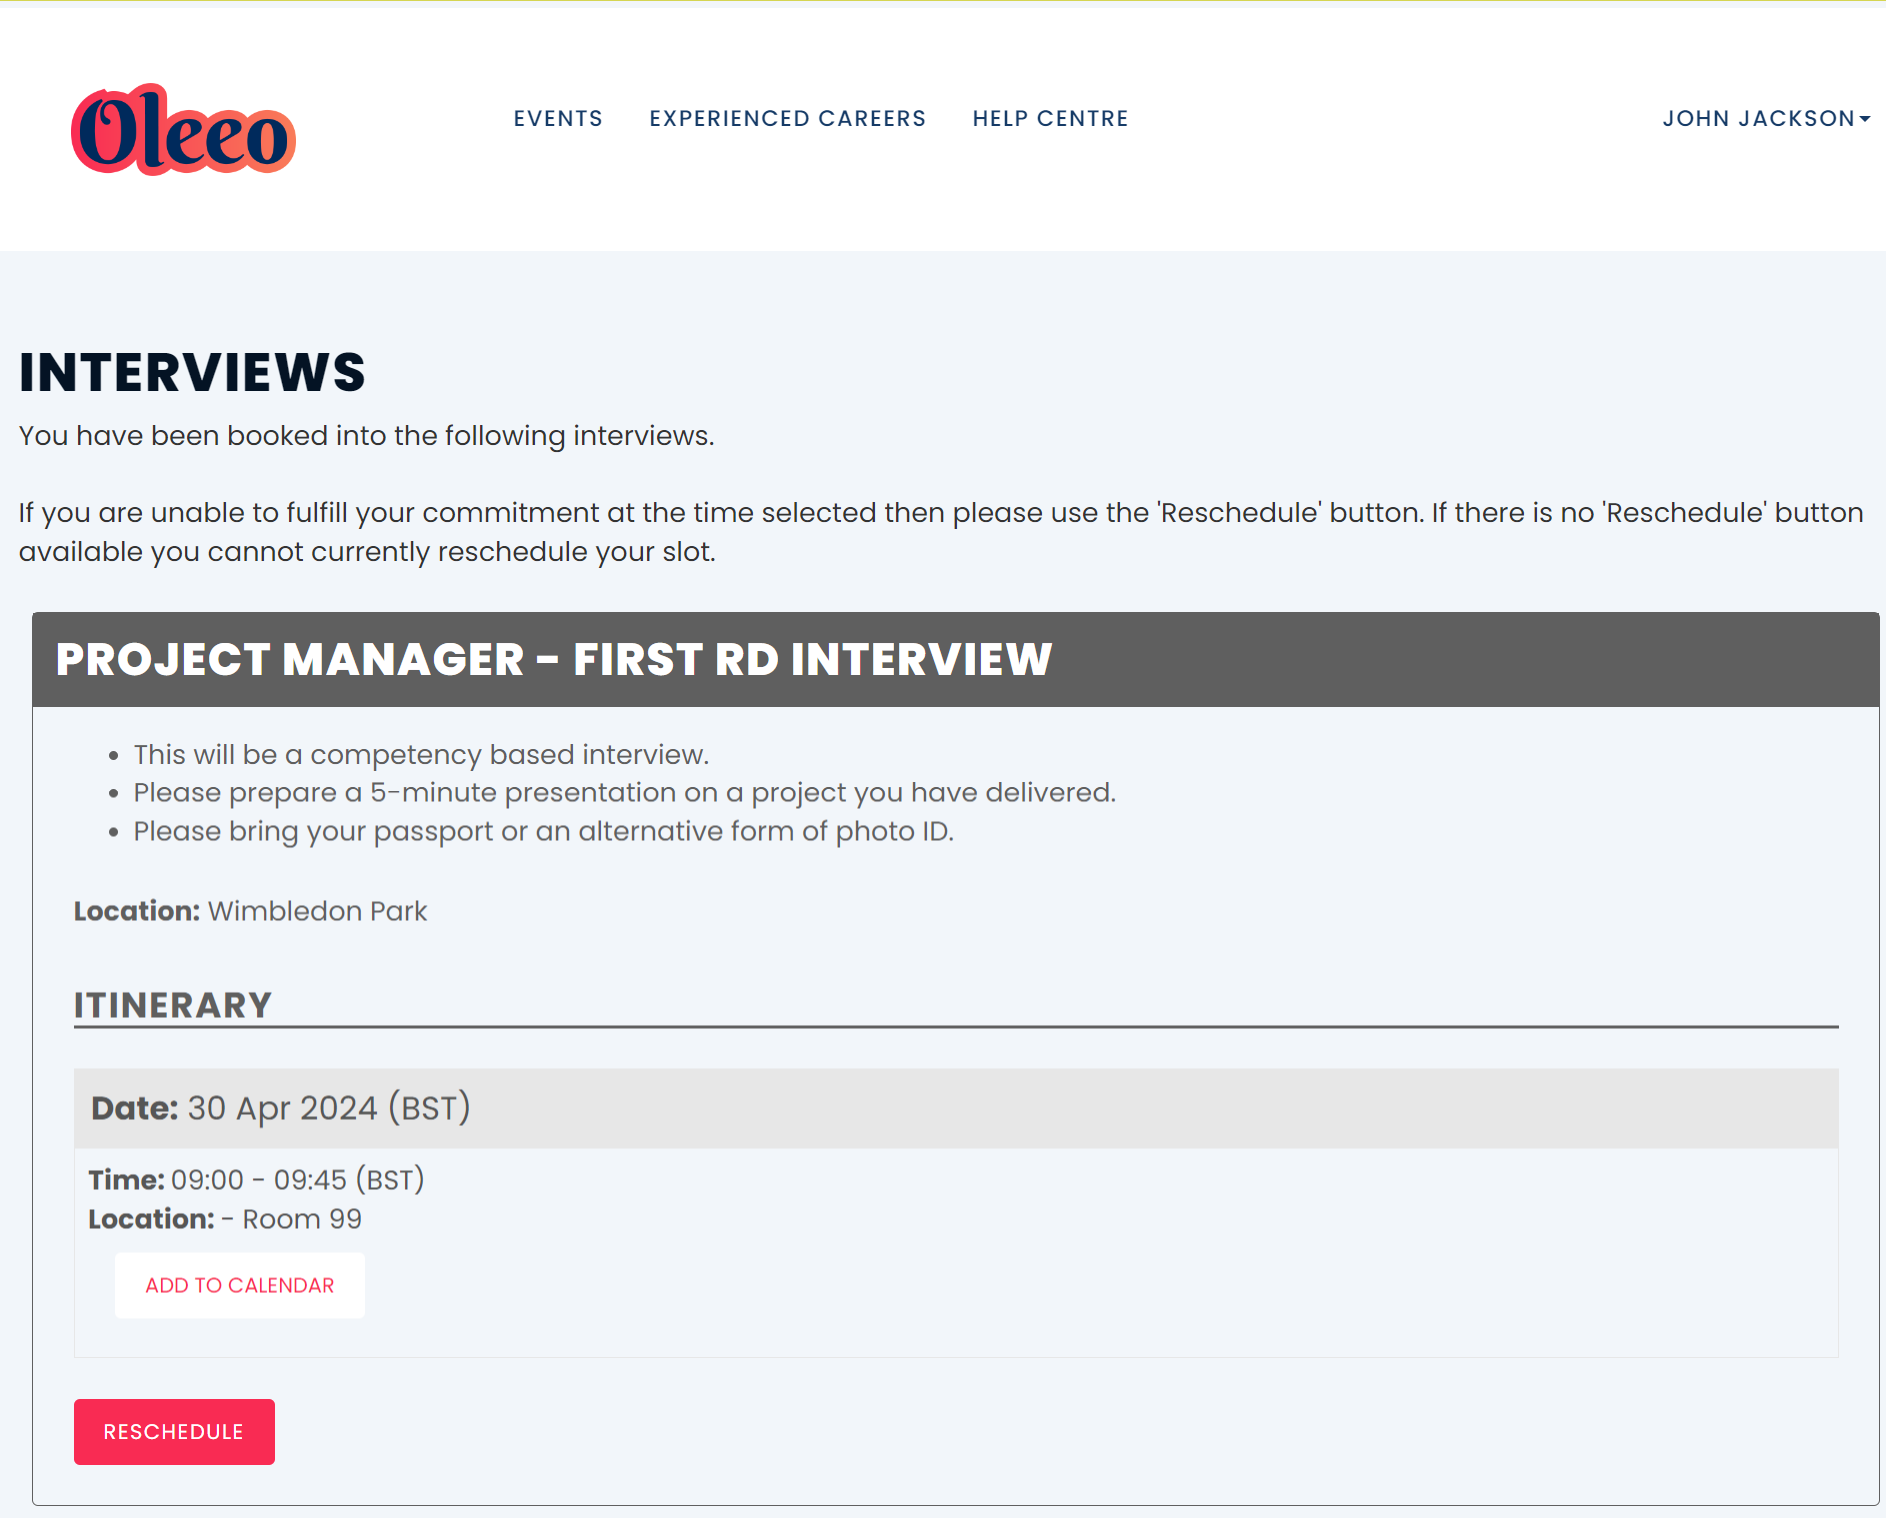
- Interview confirmation page:
- Candidates are taken to a confirmation page displaying all interview details.
- They can add the interview to their calendar.
- If rescheduling is enabled, candidates can do so until the minimum alteration notice period.
- On the day of the interview, candidates can access the video interview from the confirmation page.
Login as candidate: If you want to see what a candidate can see, use the ‘Login as Candidate’ tool which is available from the ‘Administration’ dropdown (if your permissions allow).
SELECTING A SLOT ON BEHALF OF A CANDIDATE
You can manually book a candidate into your schedule from the ATS. For example, if the candidate is unable to book because they don’t have internet access or if you have verbally agreed a time over the phone.
To book a candidate into your schedule, they must have first been invited to the interview as described in the steps above.
- Go to their Application Summary and click Book or Schedule:
- The application must first be invited for the button to appear.
- The action button, labelled something like 'Schedule' or 'Book,' is located under the application's status.
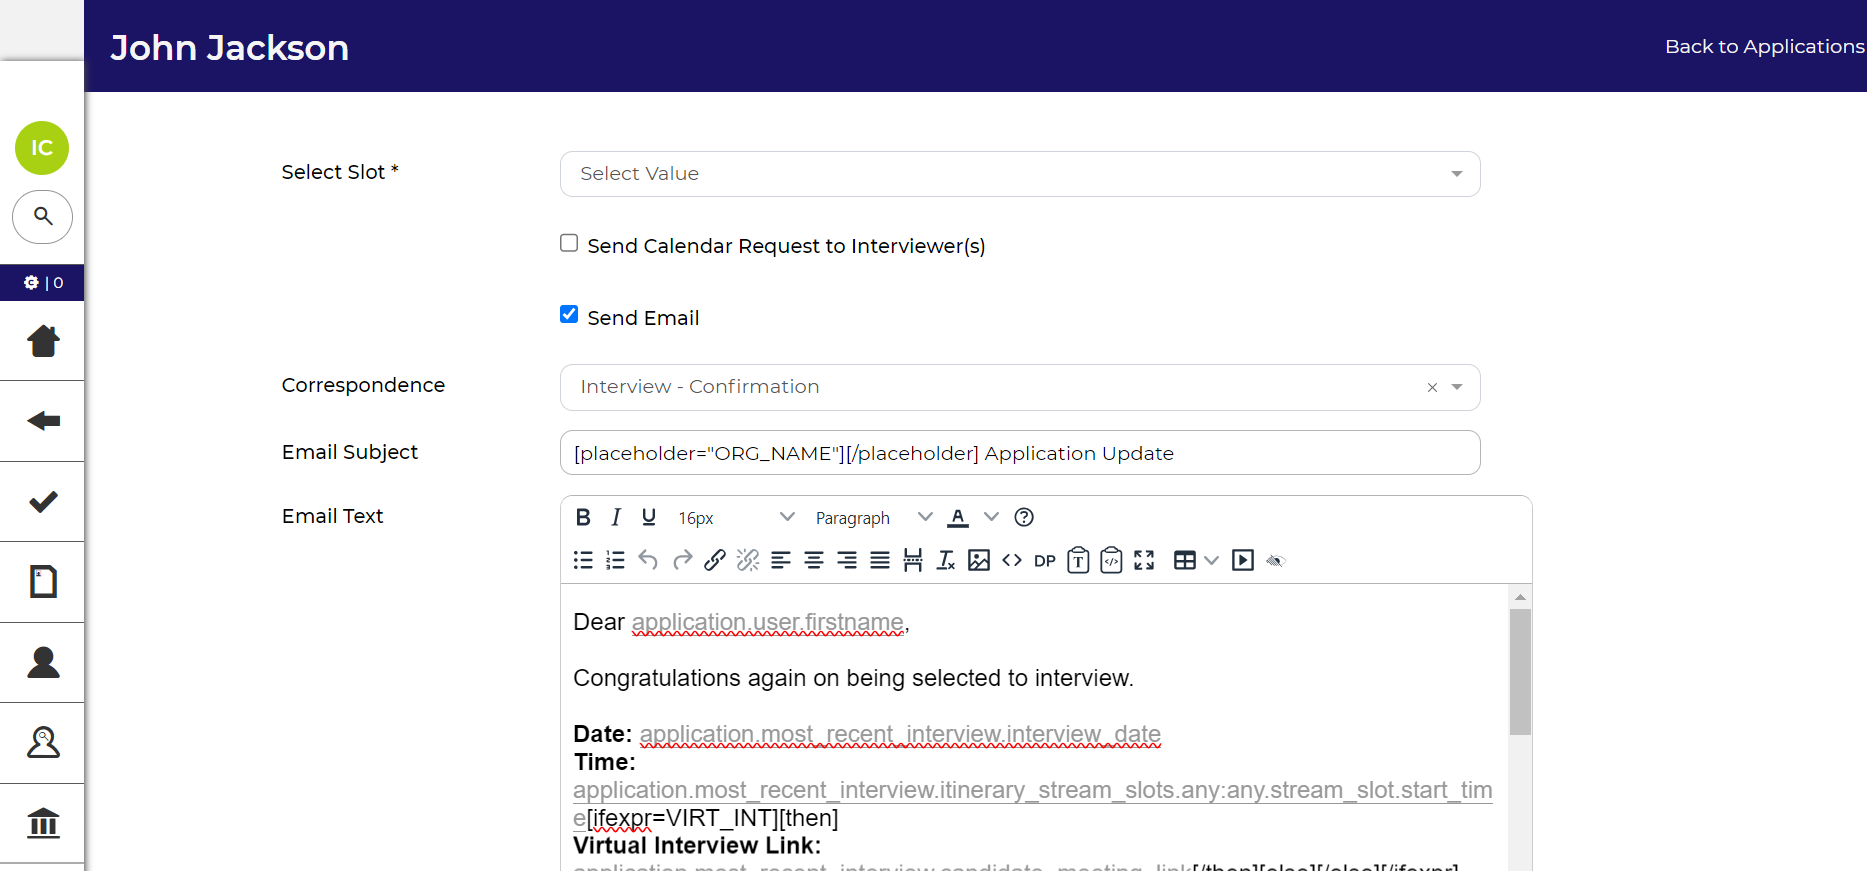
- Complete the select slot form:
- Select Slot* - In this dropdown, you can choose the slot or itinerary to book the candidate into. You will only see slots or itineraries that are attached to the interviews you selected when inviting the candidate to schedule.
- Send Calendar Request to Interviewer(s) – Tick the box if you want interviewers linked to the selected slot to receive a calendar update confirming the candidate's booking.
- Send Email – Select this check box to send the candidate a confirmation email containing the interview details.
- Correspondence - This field contains the email template for the confirmation email.
- Email Subject - This is a free text field, which you can edit if you wish.
- Email Text - You can edit the email that is being sent and use the Rich Text Editor to format the text.
- Attachments - Use to upload local files such as a map of the location or instructions.
- Preview the email:
- Click the ‘Preview’ button to review the email that will be sent to the candidate.
- Note, the interview details won’t merge in until the email is sent.
- Book the slot:
- Once you have completed these fields, click Book Slot.
- The candidate will be moved to the scheduled status and they will be able to view the interview details in the application centre.