


WHAT IS THE TIP?
💡 Enhance your Oleeo experience by leveraging Table Layouts and the "Expand Row" feature! This allows for quick access to related information, improving efficiency for recruiters, hiring managers, and system administrators alike.
Why Use Child Layouts?
Oleeo's Table Layouts (also known as Layout Listings) are powerful tools for displaying data in a clear, organised way. The "Expand Row" feature takes this a step further by allowing you to nest related information within a parent row. Instead of navigating to different pages or profiles, you can view essential details with a single click. Think of it as a "quick view" directly in your table!
This is especially useful for:
- Enterprise Leaders: Get a high-level overview of key metrics without digging into individual records.
- Talent Professionals (recruiters, HR managers): Quickly access candidate information, application history, and communication logs.
- Strategic Innovators: Identify trends and patterns by viewing related data in context.
The following are some examples of Child Layouts that can be implemented to create a better user experience.
Examples of Effective Child Layouts
-
Vacancy "Quick View": See the newest applicants for a vacancy, filtering out rejected or hired candidates. This gives recruiters an immediate snapshot of the active candidate pool.
-
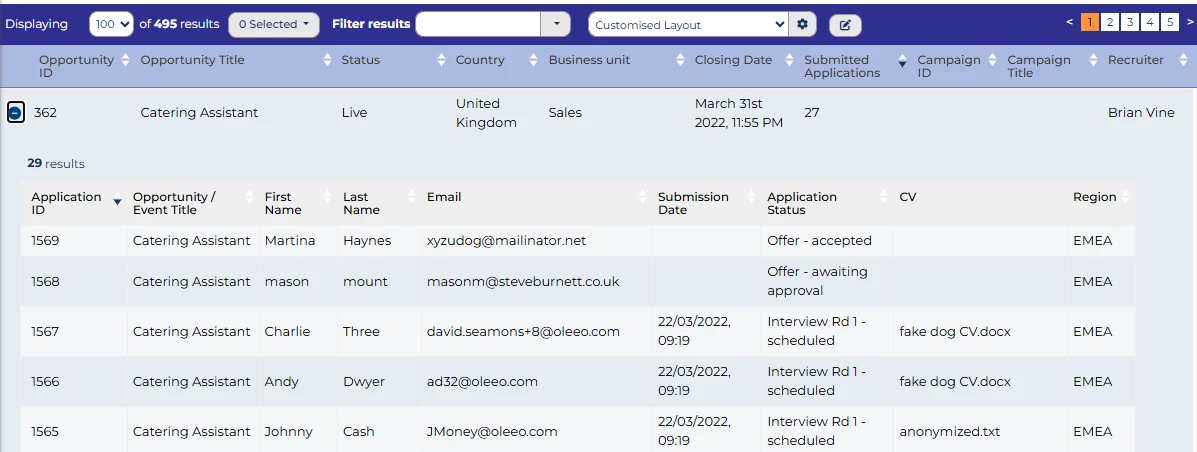
Vacancy quick view Build Instructions:
- Create the Child Layout:
- Create a new Layout Listing (Configuration > Table Layouts).
- Give it an appropriate Title e.g. Applications Quick View.
- Set "Layout applies to which type of object" to
Application. - CRITICAL: Set the "Purpose" to
Embedded. (This tells the system to strip out heavy full-page UI elements like search bars so it fits perfectly inside an expanded row). - Add columns: Candidate Name, Status, Date Applied etc.
- Set “Default rows to display per page” to 10.
- Create the Config Saved Search (The Filter):
- Go to Config Saved Searches -> Create a New System Search based on
Application. - Add Population:
-
Datapath:
Application Status (List)(or equivalent status datapath) -
Operator:
Any of -
Values: Select statuses like "New" and "Under Review".
-
-
Save as a New Search with an appropriate name
- Go to Config Saved Searches -> Create a New System Search based on
- Configure the Parent Layout:
- Return back to the Layout Listings
- Open your "Opportunities / Vacancies" layout (or equivalent)
- Go to the Expand Row tab.
- Map the Expand:
- Select Child Object: Search for and select Applications.
- Layout Listing: Select the "Embedded" layout created in Step 1.
- Saved Search: Select the config saved search created in Step 2.
- Create the Child Layout:
-
-
Interview Day Roster: Display today's interview times and attendees under a Vacancy. This helps hiring managers quickly see who's being interviewed and when.
-
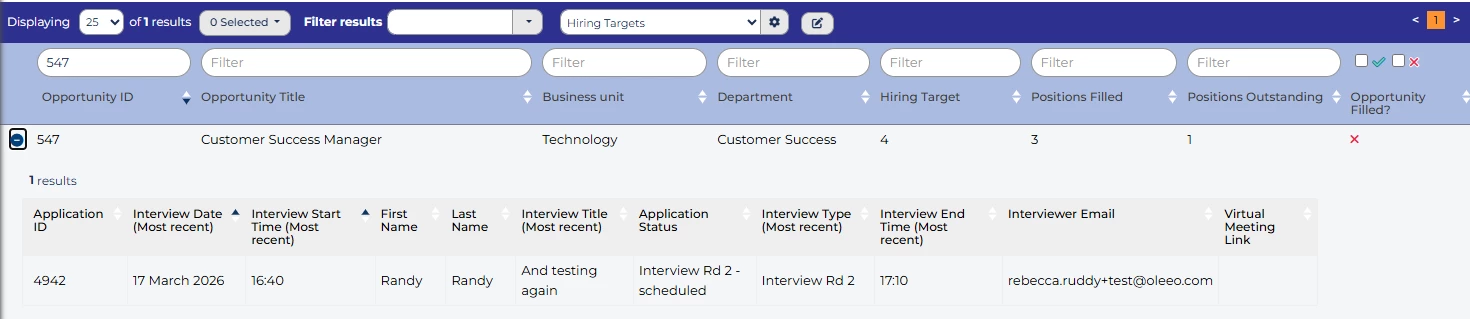
Interview Roster Build Instructions:
- Create the Child Layout:
- Create a new Layout Listing (Configuration > Table Layouts).
- Give it an appropriate Title e.g. Interview Roster.
- Set "Layout applies to which type of object" to
Application. - CRITICAL: Set the "Purpose" to
Embedded. (This tells the system to strip out heavy full-page UI elements like search bars so it fits perfectly inside an expanded row). - Add columns: Application ID, Interview Start Time, Interview End time etc.
- Create the Config Saved Search (The Filter):
- Go to Config Saved Searches -> Create a New System Search based on
Application. - Add Population:
-
Datapath:
Interview Date (Most recent)(or equivalent status datapath) -
Operator:
Equals -
Values:
This morning
-
-
Save as a New Search with an appropriate name.
- Go to Config Saved Searches -> Create a New System Search based on
- Configure the Parent Layout:
- Return back to the Layout Listings
- Open your "Opportunities / Vacancies" layout (or equivalent)
- Go to the Expand Row tab.
- Map the Expand:
- Select Child Object: Search for and select Applications.
- Layout Listing: Select the "Embedded" layout created in Step 1.
- Saved Search: Select the config saved search created in Step 2.
- Create the Child Layout:
-
-
Compliance Check: Show Pre-Employment checks for successful candidate's under a Vacancy. Ensures easy verification of required documents, such as right to work documents.
-
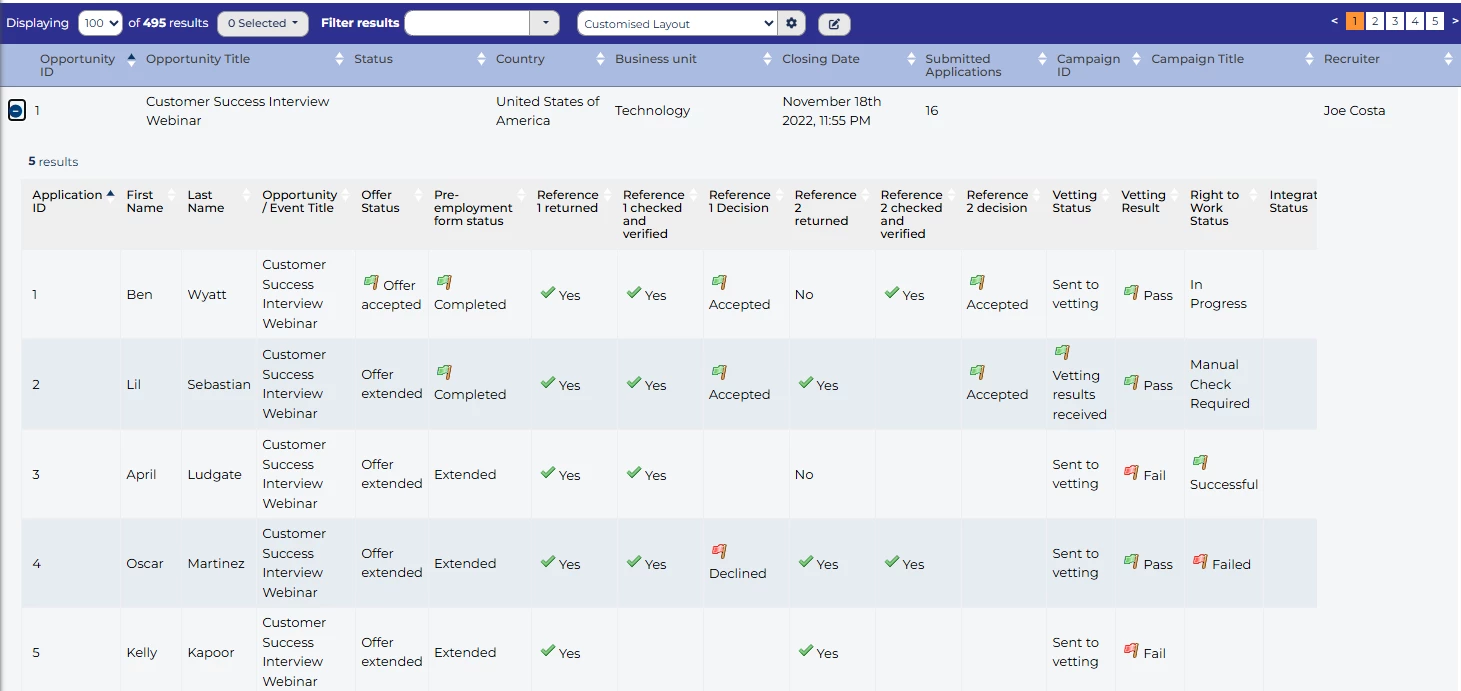
Pre-Employment Tracker Build Instructions:
- Create the Child Layout:
- Create a new Layout Listing (Configuration > Table Layouts).
- Give it an appropriate Title e.g. Pre-Employment checks.
- Set "Layout applies to which type of object" to
Application. - CRITICAL: Set the "Purpose" to
Embedded. (This tells the system to strip out heavy full-page UI elements like search bars so it fits perfectly inside an expanded row). - Add columns: Candidate Name, RTW Status, References etc.
- Create the Config Saved Search (The Filter):
- Go to Config Saved Searches -> Create a New System Search based on
Application. - Add Population:
-
Datapath:
Application Status (List)(or equivalent status datapath) -
Operator:
Any of -
Values: Select statuses like "Pre-Employment Checks" and “Onboarding” (or equivalent).
-
-
Save as a New Search with an appropriate name
- Go to Config Saved Searches -> Create a New System Search based on
- Configure the Parent Layout:
- Return back to the Layout Listings
- Open your "Opportunities / Vacancies" layout (or equivalent)
- Go to the Expand Row tab.
- Map the Expand:
- Select Child Object: Search for and select Applications.
- Layout Listing: Select the "Embedded" layout created in Step 1.
- Saved Search: Select the config saved search created in Step 2.
- Create the Child Layout:
-
-
Quick Communication Log: Allow recruiters to quickly see the email templates sent to a candidate. Confirm successful delivery of interview invites or rejection notices without opening the full candidate profile.
-
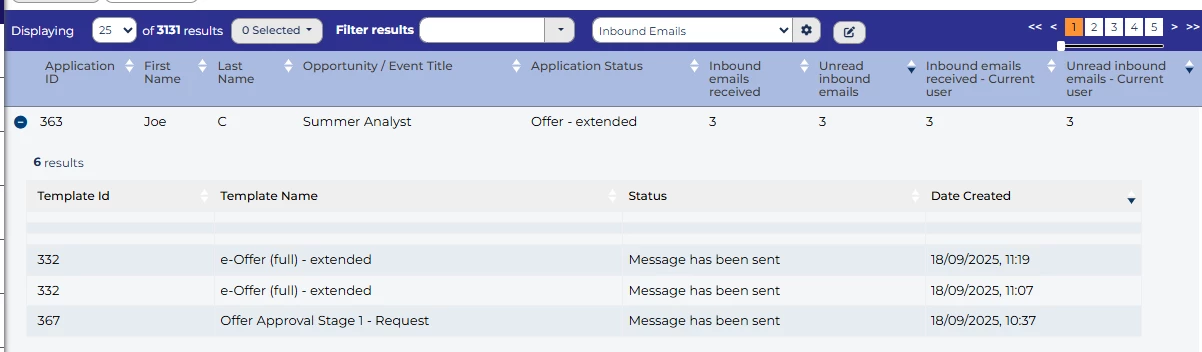
Communication log Build Instructions:
- Configure the Parent Layout:
- Go to Configuration > Table Layouts to the list of Layout Listings
- Open your "Applications" layout (or equivalent)
- Go to the Expand Row tab.
- Map the Expand:
- Select Child Object: Search for and select Email Target.
- Layout Listing: Select the "Email Status" layout.
- Configure the Parent Layout:
-
-
Candidate Application History (Talent Pool View): When viewing a "Talent Pool," expand a candidate to see all the roles they've applied for across the company. Helps sourcers understand a candidate's interests and qualifications.
-
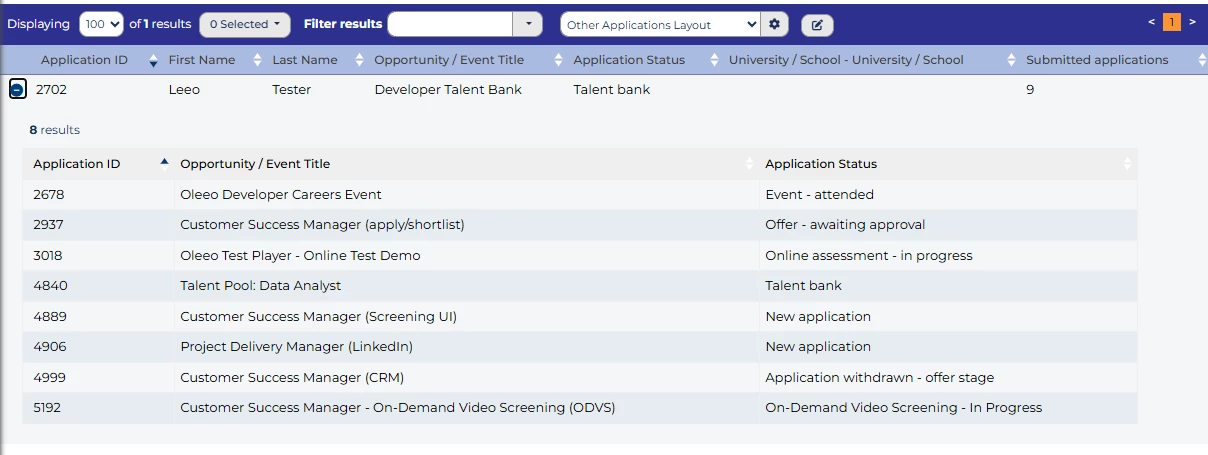
Other applications Build Instructions:
- Create the Child Layout:
- Create a new Layout Listing (Configuration > Table Layouts).
- Give it an appropriate Title e.g. Other Applications.
- Set "Layout applies to which type of object" to
Application. - CRITICAL: Set the "Purpose" to
Embedded. (This tells the system to strip out heavy full-page UI elements like search bars so it fits perfectly inside an expanded row). - Add columns: Application ID, Application Status, Submission Date etc.
- (Optional) Create the Config Saved Search (The Filter):
- Go to Config Saved Searches -> Create a New System Search based on
Application. - Add Population:
-
Datapath:
Application Status (List)(or equivalent status datapath) -
Operator:
Any except -
Values: Select statuses like "Withdrawn" and “Duplicate confirmed ” (or equivalent).
-
-
Save as a New Search with an appropriate name
- Go to Config Saved Searches -> Create a New System Search based on
- Configure the Parent Layout:
- Return back to the Layout Listings
- Open your "Applications" layout (or equivalent)
- Go to the Expand Row tab.
- Map the Expand:
- Select Child Object: Search for and select Applications.
- Layout Listing: Select the "Embedded" layout created in Step 1.
- Saved Search: Select the config saved search created in Step 2.
- Create the Child Layout:
-
-
Agency Submission Tracker: An Agency Coordinator can view a list of agencies and expand a specific agency to see the candidates they have submitted recently. Track agency performance and candidate flow.
-
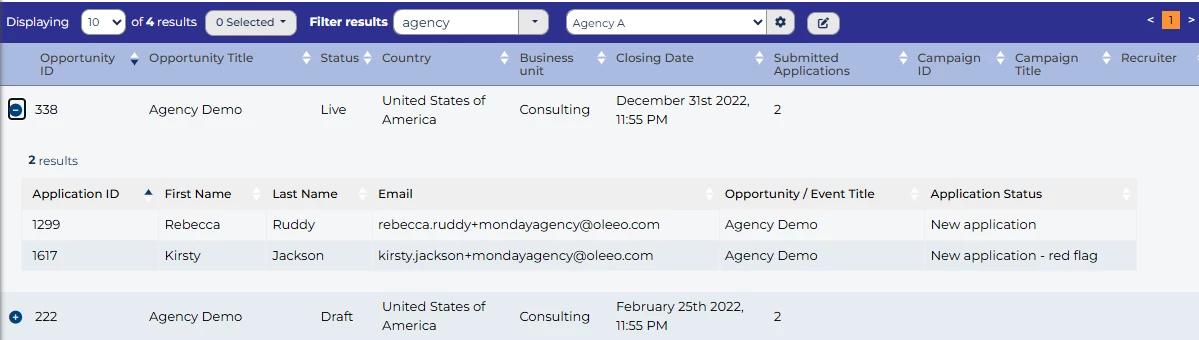
Agency tracking Build Instructions:
- Create the Child Layout:
- Create a new Layout Listing (Configuration > Table Layouts).
- Give it an appropriate Title e.g. Agency Applications.
- Set "Layout applies to which type of object" to
Application. - CRITICAL: Set the "Purpose" to
Embedded. (This tells the system to strip out heavy full-page UI elements like search bars so it fits perfectly inside an expanded row). - Add columns: Candidate Name, Agency, Application Status, Submission date etc.
- Set “Default rows to display per page” to 10.
- Create the Config Saved Search (The Filter):
- Go to Config Saved Searches -> Create a New System Search based on
Application. - Add Population:
-
Datapath:
Application Type(or equivalent status datapath) -
Operator:
Any of -
Values: Select "Agency" (or equivalent).
-
-
Save as a New Search with an appropriate name
- Go to Config Saved Searches -> Create a New System Search based on
- Configure the Parent Layout:
- Return back to the Layout Listings
- Open your "Opportunities / Vacancies" layout (or equivalent)
- Go to the Expand Row tab.
- Map the Expand:
- Select Child Object: Search for and select Applications.
- Layout Listing: Select the "Embedded" layout created in Step 1.
- Saved Search: Select the config saved search created in Step 2.
- Create the Child Layout:
-
-
Bounced Email Auditor: Quickly highlight any delivery failures for a candidate. Recruiters know to call candidates instead, especially if an interview invite bounced.
-
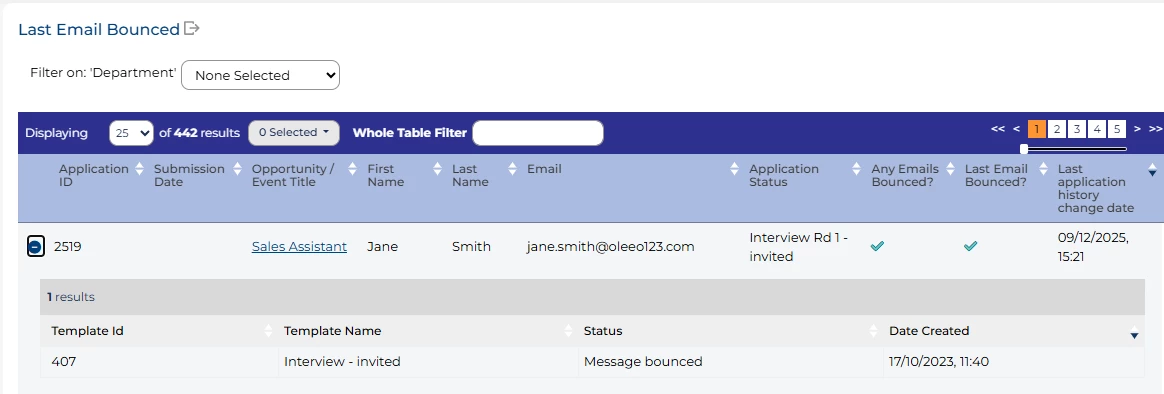
Email Bounce Build Instructions:
- Create the Config Saved Search (The Filter):
- Go to Config Saved Searches -> Create a New System Search based on
Application. - Add Population:
-
Datapath:
Any Emails Bounced? [application.any_email_status.any:3](or equivalent status datapath) -
Operator:
Any of -
Values: Select "Yes".
-
-
Save as a New Search with an appropriate name
- Go to Config Saved Searches -> Create a New System Search based on
- Configure the Parent Layout:
- Go to Configuration > Table Layouts to the list of Layout Listings
- Open your "Applications" layout (or equivalent)
- Add Datapaths:
Any Emails Bounced? [application.any_email_status.any:3]Last Email Bounced? [application.last_email_status.any:3]
- Go to the Expand Row tab.
- Map the Expand:
- Select Child Object: Search for and select Email Target.
- Layout Listing: Select the "Email Status" layout.
- Setup Homepage Widget:
- Go to Configuration > Homepage Config to the list of homepages
- Select your relevant homepage, press Setup widgets
- Create a new tab, give it an appropriate name e.g. Emails Bounced?.
- Add a new widget, select “One of my Saved searches” (or whichever is most relevant)
- Saved Search: Select the config saved search created in Step 1.
- Table Layout: Select the "Parent" layout created in Step 2.
- Create the Config Saved Search (The Filter):
-
-
Application Comments Log: View a chronological log of notes and comments made by recruiters or Hiring Managers on a specific application without clicking into the candidate's history tab. Get context on a candidate's progress.
-
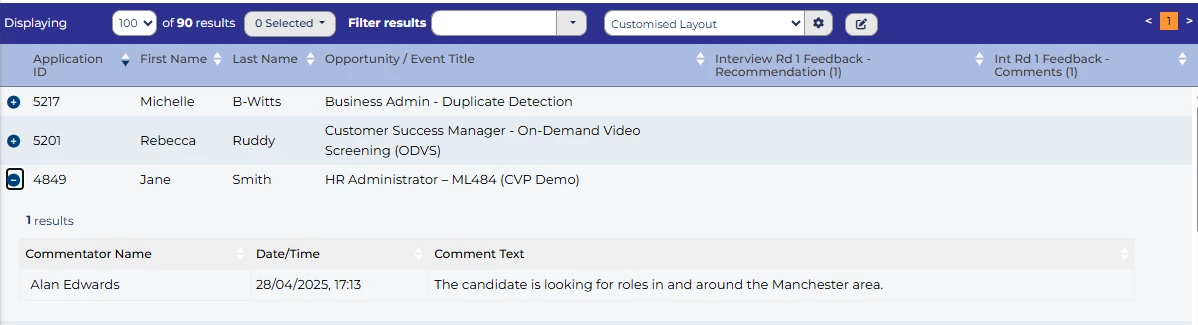
Application comments Build Instructions:
- Configure the Parent Layout:
- Go to Configuration > Table Layouts to the list of Layout Listings
- Open your "Applications" layout (or equivalent)
- Go to the Expand Row tab.
- Map the Expand:
- Select Child Object: Search for and select Comments.
- Layout Listing: Select the "Layout Listing Comments" layout.
- Configure the Parent Layout:
-
-
Process History Tracker: Audit how long a candidate spent at each stage of the recruitment process. See exactly when they moved from "New" to "Phone Screen" to "Interview." Identify bottlenecks in your process.
-
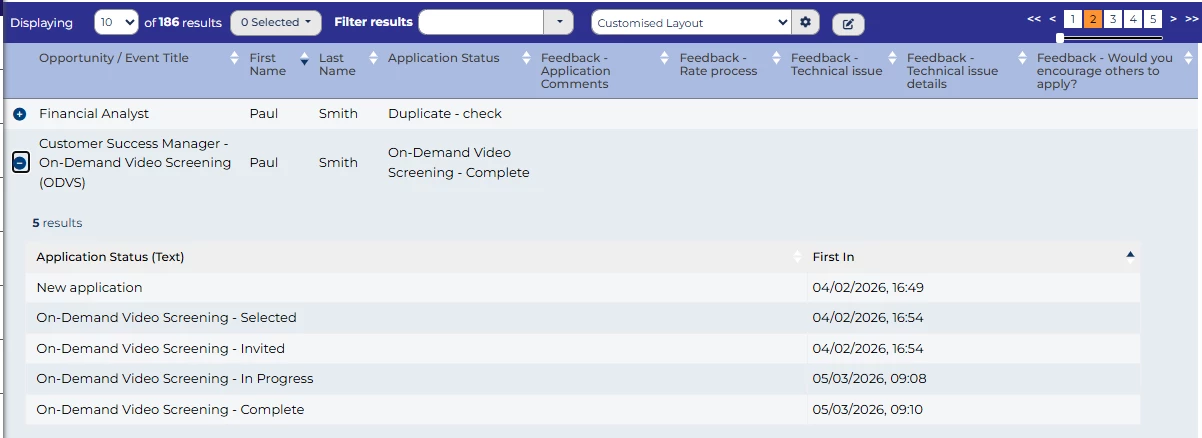
Process history tracker Build Instructions:
- Configure the Parent Layout:
- Go to Configuration > Table Layouts to the list of Layout Listings
- Open your "Applications" layout (or equivalent)
- Go to the Expand Row tab.
- Map the Expand:
- Select Child Object: Search for and select Process state records.
- Layout Listing: Select the "Status History" layout.
- Configure the Parent Layout:
-
-
Live Posting Information: From a master list of Opportunities/Vacancies, quickly see which job boards a role is currently active on and when the postings expire. Monitor job board performance and ensure postings are up-to-date.
-
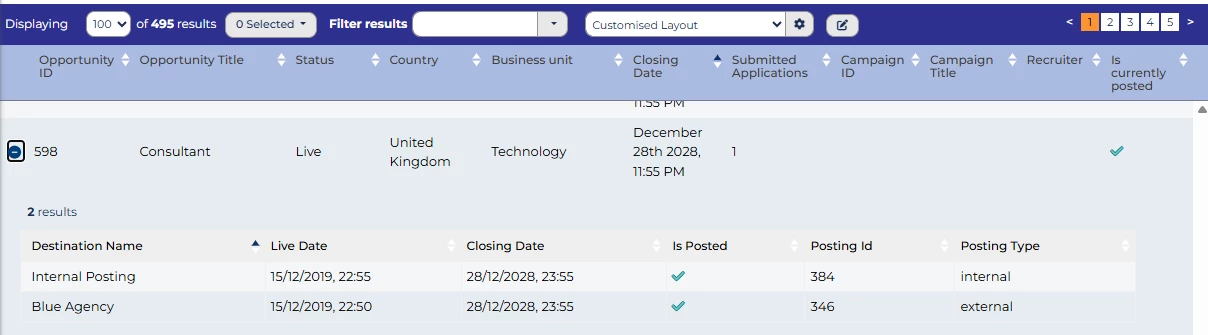
Job posting Information Build Instructions:
Configure the Parent Layout:
- Go to Configuration > Table Layouts to the list of Layout Listings
- Open your "Opportunities / Vacancies" layout (or equivalent)
- Go to the Expand Row tab.
Map the Expand:
- Select Child Object: Search for and select Posting Aggregate Data.
- Layout Listing: Select the "Child Posting Layout" layout.
-
BENEFITS
- Improved Efficiency: Access related information quickly, reducing clicks and navigation.
- Enhanced User Experience: Provides a more intuitive and streamlined workflow.
- Better Data Visibility: See the big picture by viewing data in context.
- Streamlined Compliance: Easily verify required checks and track communication.
- Improved Decision-Making: Make informed decisions with quick access to relevant information.
CONSIDERATIONS
- Proper planning is essential to determine which relationships should be shown in the Child Layouts.
- The number of Child Layouts should be limited to ensure optimum performance of the system.
COSTS
This feature is part of the standard product offering.
If you need Oleeo to implement anything, we will provide you with a quote based on your requirements.
NEXT STEPS
Refer to the Configuration Guide or speak to our Support Team for configuration guidance. Contact your Customer Success Manager for more information.
If you would like Oleeo to implement this for you, please raise a case to our delivery team.
ADDITIONAL INFORMATION:
