

OVERVIEW OF LAYOUTS
When viewing a list of applications, information is presented using a structured layout, allowing you to scan a list of applications for key information.
The information displayed can be tailored to suit the specific task at hand. For instance, the details you'd want to see while screening applications may differ from what's relevant when reviewing applications in the pre-employment checks stage.
To enhance flexibility, you have two options:
- Public Layout Templates:
- Easily switch between predefined layouts optimised for common tasks. These templates offer a standardised view, making it convenient for various purposes.
- Easily switch between predefined layouts optimised for common tasks. These templates offer a standardised view, making it convenient for various purposes.
- Create your own Customised (Private) Layouts:
- You can arrange columns to display precisely the information you need for the specific task you are performing.
You can export the list of applications, formatted according to your chosen layout, into a spreadsheet. This allows you to leverage the analytical tools in Excel for a deeper dive into the information, giving you even more control over your data and insights.
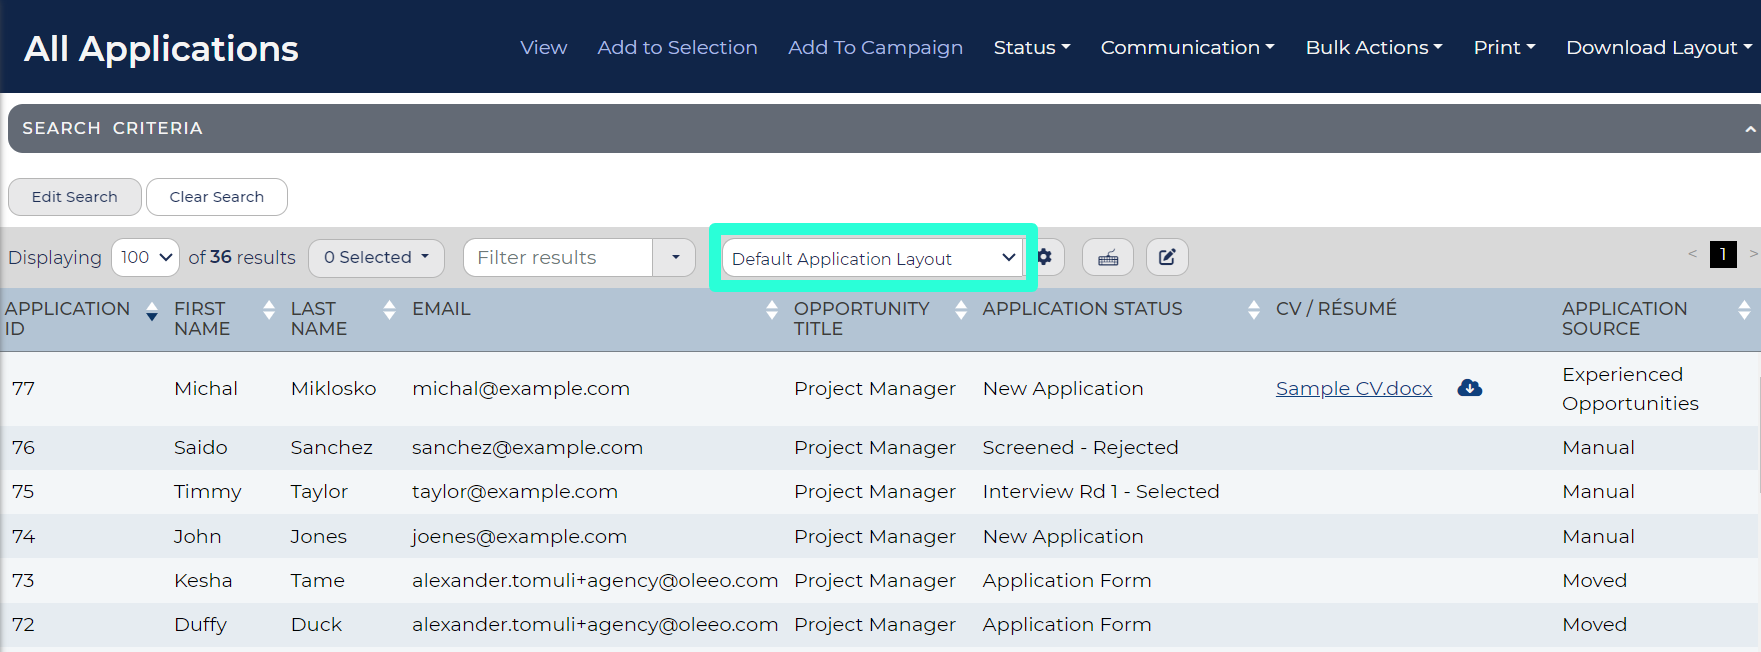
SWITCHING TO A DIFFERENT PUBLIC OR PRIVATE LAYOUT
Your system offers various Public layouts and allows you to create your own Private layouts.
To switch layouts when viewing a list of applications:
- Click on the dropdown box above the list and select a layout.
- Any customised layouts that you have created will appear at the bottom of the list under the 'Private' heading.
- Once you've made a selection, the page will refresh, presenting the same list of applications. However, you'll now see data aligned with the columns of the chosen layout.
CREATING YOUR OWN CUSTOMISED LAYOUT
STEP 1: Open the 'Edit Page layout' box
- From any list of applications, switch to the Layout that most closely resembles the new layout that you want to create.
- Click on the 'Customise Layout' icon
 located to the right of the layout dropdown, symbolised by a cog (gear) icon.

- This will open the 'Edit page layout' pop-up window.

STEP 2: Add new fields
- In the 'Layout Columns' tab, click on the search box located at the bottom of the tab, labeled Please choose an item to add...
- Fields are organised under headings which indicate where on the system the field is used.
- Start typing a keyword to search the list and and select the field.
- Once you have selected a field you can start searching for the next field you would like to add.

- Once you have selected all the fields you would like to add click the Add Field button below.
- The field will be included in the Layout columns table, visible in the tab above the search box.

Use [CTRL] key to select multiple fields:
- You can select multiple fields from the list by holding down the [CTRL] key on your keyboard.
STEP 3: Adjust the layout of the columns
As well as adding fields, you can make the following adjustments from the Layout columns tab, you can:
- Change column order – Click and hold on the six dots
 on the left side of the field, and move up or down to the required position.
 - Rename the column – Hover over the name of the field and the name will be highlit in blue. Click the name and you will be able to edit it so that it is more concise and relevant as a column heading.
- Change the sort order – In the Sort column click in to the dropdown to choose either Sort Ascending or Sort Descending. If multiple fields are selected it will sort by the first field in the list first.
- Hide/unhide column – You can hide or unhide a column from your list of applications using the tick boxes in the 'Hidden' column. This is useful if you want to sort by a field but not present it in the layout or if you want to make a field easy to add back to the layout at any time.
- Add Icons/Flags - In the 'Icons' column, you will see an 'Add Flag' link next to any field where the responses are chosen from a pre-defined list. This will allow you to add a symbol to highlight specific answers so they are easy to spot. There are 90 different icons to choose from.
- Delete column – Click on the cross icon
 in the 'Delete' column for the field you would like to remove.

In this example, the 'Submission Date' column is hidden, applications are sorted in descending order by ID number so that the most recent applications appear at the top of the list, and a green flag icon will show for 'Current Employees'.
STEP 4: Adjust the Settings (optional step)
From the 'Settings' tab you can make the following changes:
- Default rows to display per page - Select between 10, 25, 50 and 100 applications per page.
- Enable Popup - This action will insert a speech bubble into the first column for each application on the list. Clicking on the speech bubble will reveal the Opportunity Title and Application Status, with options for users to 'Add to Selection' or 'View' via a button.
- Fix Visible Left Columns - This feature enables you to anchor a designated set of columns, such as App ID, First Name, and Last Name, while horizontally scrolling. Simply enter the desired number of columns to fix (e.g. entering '3' will keep the first three columns in place). This becomes especially beneficial when managing extensive datasets with numerous columns.
STEP 5: Add an Expandable Row (optional step)
The 'Expand Row' tab empowers users to delve deeper into information by adding an additional layer (Child Object) to the displayed list of applications.
Once applied, a new 'Expand / Collapse Row' icon ![]() will appear on the left of each row.
will appear on the left of each row.
Examples of Child Objects:
- The user who made the application > Applications made - This action will show the other applications made by each candidate in the list. For more details, refer to the guide later on this page: #Displaying the other applications made by each candidate.
- Comments - This will list all the comments attached to each application, typically including the commentator's name, date added and comment text.
Expandable rows not compatible with fixing visible left columns:
- If you have selected to fix visible left columns in the 'Settings' tab you will not be able to add an Expandable Row.
STEP 6: Save your layout
If you only plan to use this layout once:
- Click the 'Save Changes' button at the bottom of the 'Edit page layout' box.
- The list of applications will refresh and the applications will be displayed using the adjusted layout.
If you would like to re-use the layout for other searches:
- Once you have set up your layout, click the Save as new layout button at the bottom of the 'Edit page layout' box.
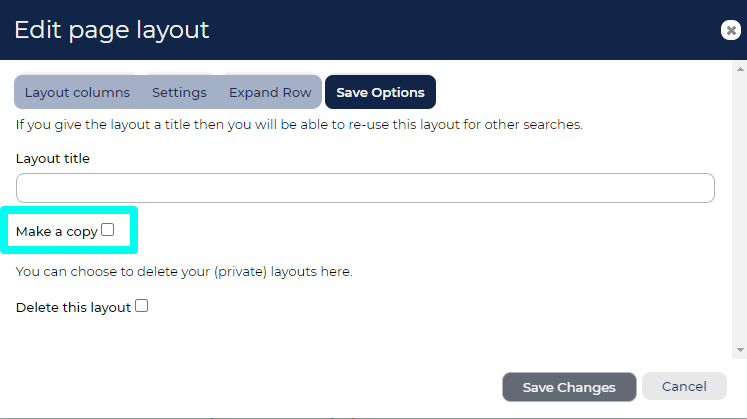
- You will be taken to the 'Save Options' tab.
- Enter a Layout title.
- If you are adjusting one of your Private layouts, there will be a 'Make a copy' tick box. Select this to create a new private layout, otherwise the existing layout will be overwritten. This option is not available when adjusting a Public layout.
- Click Save Changes.
- The list of applications will refresh and the applications will be displayed using the new layout.
- You will be able to switch to it at any time from the list of layouts dropdown.
You cannot create Public Layouts:
- Any customised layout that you create will only be available to you.
- If a new Public layout is needed or adjustments are required, reach out to a Super User. They have access to make or request these changes.
CREATING A NEW PRIVATE LAYOUT BY AMENDING AN EXISTING PRIVATE LAYOUT
If you are working with a private layout and makes a change to it e.g. adding a new column - you have the option to save the amended layout as a new private layout, rather than it overwriting the existing layout. To save a new private layout from an amended existing private layout - go to Save Options, give it a title and tick Make a copy.
DISPLAYING THE OTHER APPLICATIONS MADE BY EACH CANDIDATE
You can add an expandable row (child layout) to your layout that displayed the other applications that each candidate has made. To do this:
- Click on the Customise Layout icon located to the right of the layout dropdown, symbolised by a cog (gear) icon.
- In the pop-up, navigate to the Expand Row tab.
- Complete the fields in this tab as follows:
- Select Child Object - Choose 'The user who made the application > Applications made' from this dropdown.
- Layout Listing - Pick the layout you'd like to use to display the other applications the candidates have made.
- Saved Search Filter - Leave this field blank to display all the other applications made by each candidate. Alternatively, select a saved search to limit displayed applications based on specific criteria (e.g. show only applications submitted this year).
- Once applied, a new 'Expand / Collapse Row' icon
 will appear on the left of each row.
 - To view the other applications for a specific application, select the corresponding expandable list icon.
DOWNLOADING APPLICATIONS TO A SPREADSHEET
You can download any list of applications into a spreadsheet. The layout of the spreadsheet will be the same as the layout presented to you on the system (e.g. the same columns will be downloaded and the applications will be in the same order).
To export a list of applications:
- Bring up the list of applications on the screen.
- Optional: If you only want specific applications in the search, click on their rows to select them before downloading.
- In the toolbar at the top-right of the page, click on the Download Layout dropdown and then select the download option you require:
- Download All - Click on this to download all the applications in the search.
- Download Selected Rows - Click on this option if you have selected specific applications.
- In the information box that opens, click OK.
- A spreadsheet will be downloaded that you can open in another application such as Excel.
APPLYING LAYOUTS TO SAVED SEARCHES
You can apply a layout to a saved search so that it is used every time the search is loaded.
To do this:
- From the left-hand menu, go to My Tasks > View Saved Searches.
- Single click on a search and click Edit Properties in the toolbar.
- In the Select Default Layout dropdown, select a layout:
- For Private searches you will be able to choose from both Public and Private Layouts.
- From Public searches you will only be able to choose from Public Layouts.
- Click Save Search.
Applying a layout to a Public search is universal:
- If you save a layout to a Public search, it does not just save it for your account. It will be applied for all users.


