


WHAT IS THE TIP?
💡 Embedding documents into your process via forms, table layouts and also in the candidate summary can be a time saving exercise. Allowing you and your team to quickly find the relevant document that has been uploaded into or generated by the ATS.
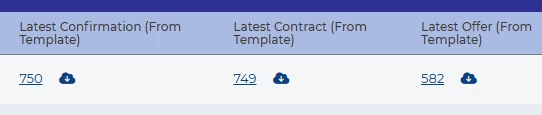
Latest Generated Document In A Table Layout
💡 Perfect for contracts/offer letters, always having the most up-to-date version of the document.
Did you know you can pull the latest letter that the system has generated into forms and table layouts? This allows you to always refer to the latest document, while keeping an audit in the application history of any previous versions.
Simply include an action group for the relevant letter into the below datapath and include it within your application data dictionary.
LATEST_FILE(application.documents.ag:ACTION_GROUP_ID.document_instance_all.pdf_file_id)
Then update the relevant table layouts with the new data dictionary addition.
🔧 Use case:
- Always have the most up-to-date and correct information related to those documents.
- Quick glance of offer/contract creation process, allowing you to identify any missing documents.
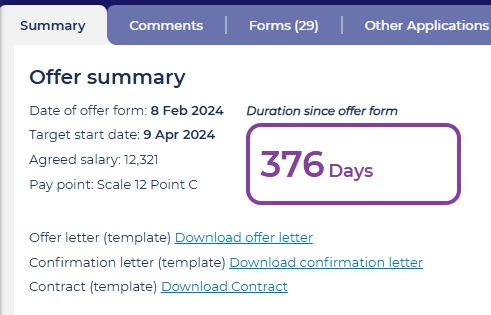
Latest Generated Document In The Candidate Summary
💡 Perfect for dynamic candidate summary display forms, using a combination of labels and visibility rules to only show information when it relevant to the user you can reveal the document(s) as well other important information.
When you are using the candidate summary form instead of the candidate summary table layout you can start to build very dynamic forms. This option saves time and effort by allowing you to see other form information without needing to enter each form individually.
Expand this to see how this was done.
Using the label component in the form editor you can create a hyperlink to the latest document, replacing “ACTION_GROUP_ID” with yours.
Offer letter (template) [urlpath="application.recruiter_document_link_ag(ACTION_GROUP_ID)"]Download offer letter[/urlpath]
The label component will require a visibility rule to only reveal it, once the file is generated. Again, replacing “ACTION_GROUP_ID” with yours
<DTREE>
  <IF><EVAL>EXISTS(application.recruiter_document_link_ag(ACTION_GROUP_ID)) == 1</EVAL></IF>
  <THEN>1</THEN>
  <ELSE>0</ELSE>
</DTREE>
🔧 Use case:
- Always have the most up-to-date and correct information related to those documents.
- Grouping important information from different forms together, to have an overview of what documents have been generated.
❗️ Please note: If your system is not using the candidate summary display form and instead you are using the table layout version, you will need to submit a change request to have your system updated.
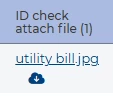
Document In A Table Layout
💡 Ideal for scenarios where this is only one file and no requirement for version control.
When managing high-volume recruitment, there are times when you need to see the landscape of how many documents have been uploaded by candidates for onboarding or pre-employment checks. Instead of checking each record individually, Using the table layout lets you quickly pick out those you have completed the action and send a chaser to those you haven’t, saving time and ensuring consistency.
Ensure your file item is included in the application’s data dictionary, then you will be able to include it in the table layout.
Expand to learn more.
In my example a candidate can upload upto 10 attachments, when you are adding the item to the table layout an additional drop down box will appear, “Choose item instance” this will list the number of each instance, 1 = the first file uploaded, 2 = the second file uploaded and so on.
If you give the candidate the opportunity to upload more than one instance of the item, it is recommended that you also include all within the table layout, so not to miss any documents.

🔧 Use case:
- Onboarding or Pre-employment check summary table layouts, for quick overviews of all candidates.
- Uploaded offline feedback documents for screeners or interviewers
- Submitted presentations from candidates
Document In A Form
💡 Perfect for teams who manage particular parts of the process requiring documents to be reviewed or verified.
Some users may need to extract those files for audit purposes or to examine in greater detail. With Oleeo, you can seamlessly include the item into the relevant form, saving time and ensuring all data is centralised.
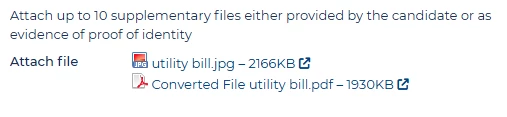
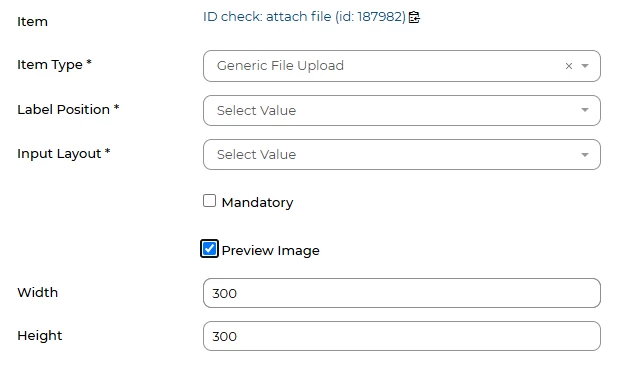
For those who would prefer to see a preview of the file, especially for image files, a preview option can be enabled in the settings to allow it to be displayed in the form.
Expand to learn how to enable this.
Within the field properties, enabling the preview image option will allow you to define the size of the preview image.
🔧 Use case:
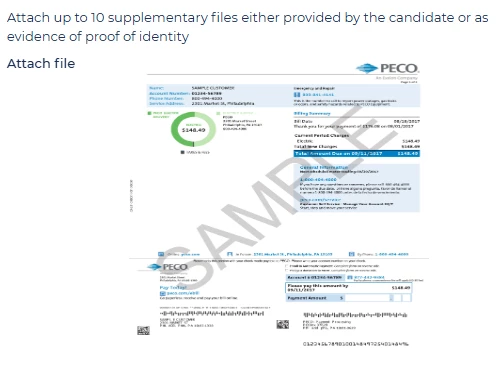
- Pre-employment checks - preview of passport/driving licence photos, bank statements, proof of address
😊 Share Your Success Stories! Have you used embedded documents to simplify your process? Let us know how it’s helped you manage your data more efficiently!
BENEFITS
- Efficiency: Save time by seeing if documents exist in bulk rather than individually.
- Flexibility: Using it as a table layout or in a dynamic form, view the documents that suit your needs.
CONSIDERATIONS
- If your system is not using the candidate summary display form and instead you are using the table layout version, you will need to submit a change request to have your system updated.
COSTS
This feature is part of the standard product offering.
NEXT STEPS
- Identify areas in your system that would benefit from embedded documents.
- Speak to your Customer Success Manager for further guidance or tips on optimising your table layouts or candidate summary.
ADDITIONAL INFORMATION:


