


WHAT IS THE TIP?
💡 Enhance your recruitment analytics: Discover how to connect Oleeo to Google Analytics using Google Tag Manager! Streamline tracking, capture more insightful data, and synergise your hiring efforts with robust analytics.
Out of the box Oleeo can provide you with a standard set of datapoints that can enable you to connect the dots to campaigns outside of the ATS system.
Examples of the datapoints that are sent by default:
| adhoc_referrer: COMPANY_WEBSITE, | Adhoc Referrer Token |
| cand_id: 9856, | Candidate ID |
| app_id: 10254, | Application ID |
| opp_title: "Receptionist", | Vacancy/Opportunity Title |
| is_submit: 1, | Submitted Application |
| form_id: 1536, | Form ID |
| opp_id: 42, | Vacancy/Opportunity ID |
In the hidden section below we will take you through the steps required to get that data flowing into your Google Analytics dashboard.
STEP 1: SET UP GOOGLE TAG MANAGER
🔧 Log In: Head over to Google Tag Manager and log in with your Google account (or create one).
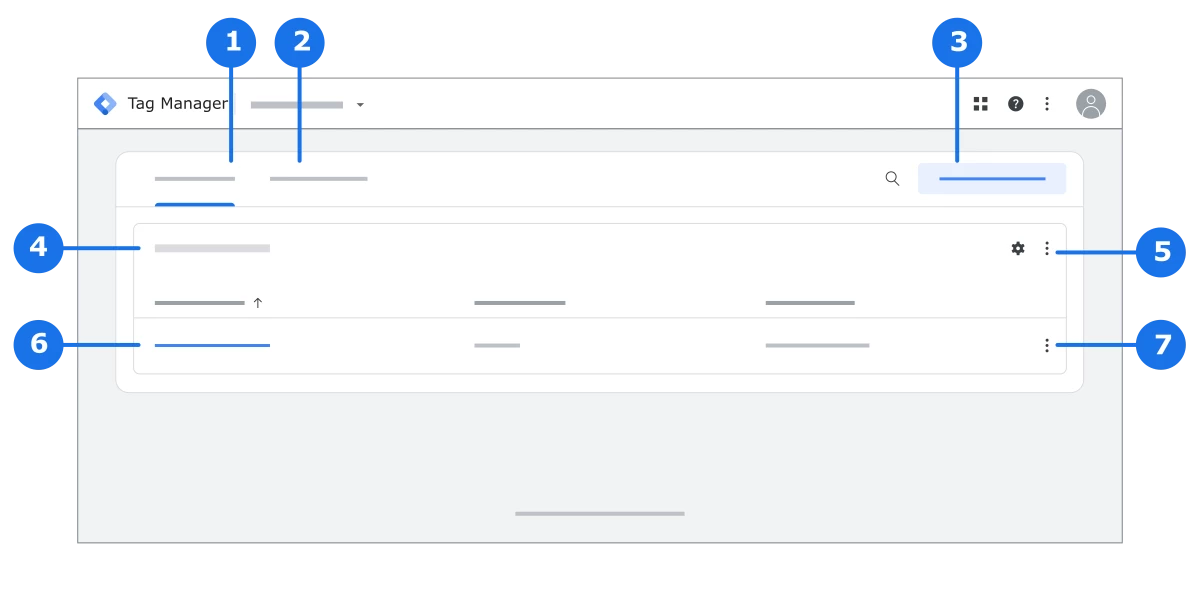
On that page:
The Accounts tab lets you view and edit your Tag Manager containers and the settings for each account and container.
The Google tags tab lets you view and edit the Google tag settings for all the tags associated with your Google Account.
The Create account button lets you create a Tag Manager account that's associated with your Google Account.
View the name of the Tag Manager account.
View and edit the Tag Manager account settings.
View and open the containers within the Tag Manager account.
View and edit the container within the Tag Manager account.
🔧 Create a New Account: Click on "Create Account" and provide the necessary details like account name, country, container name, and target platform (select "Web").
STEP 2: CREATE A GOOGLE TAG MANAGER ACCOUNT
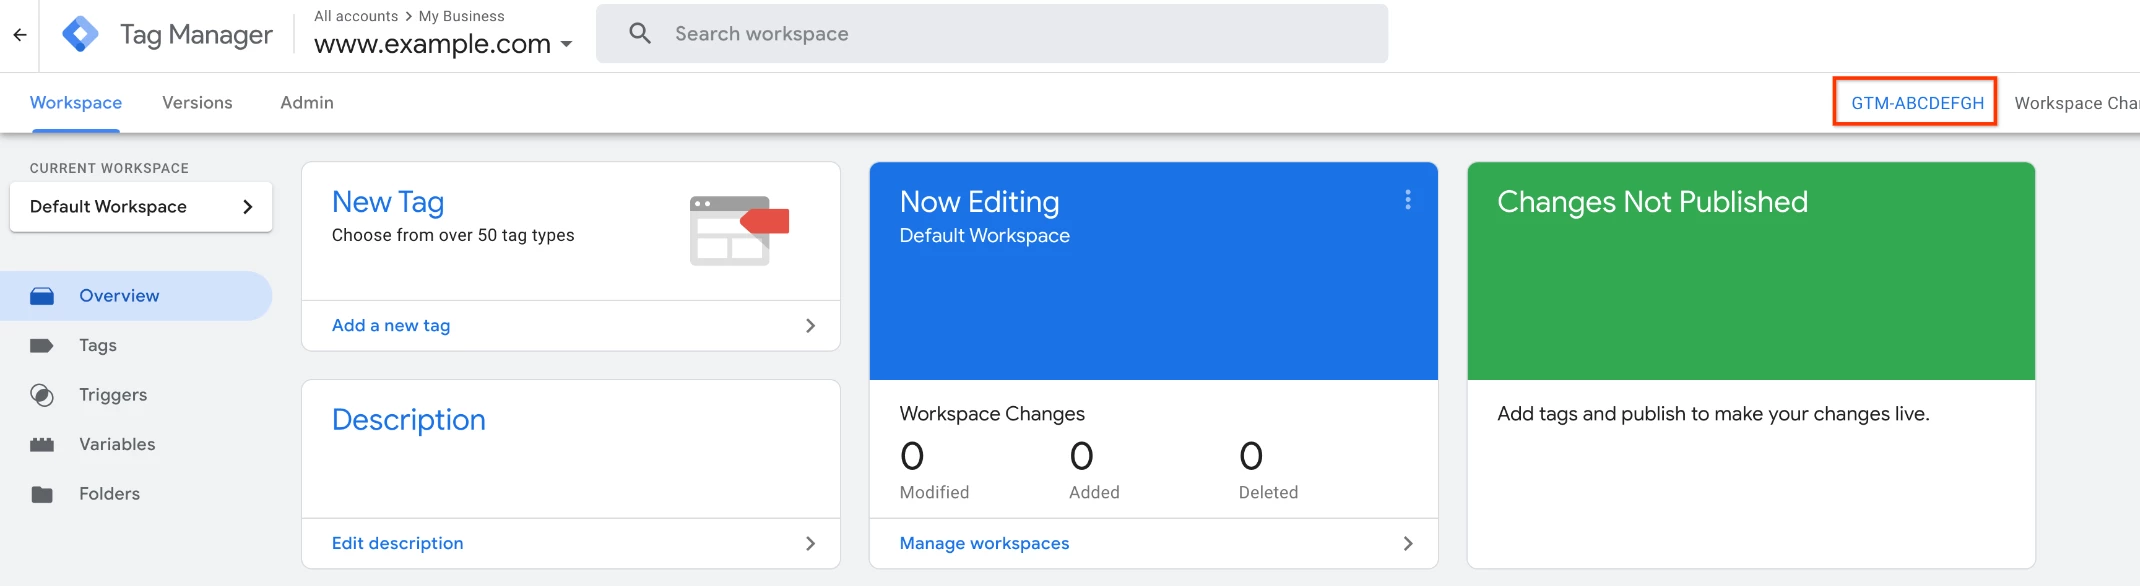
🔧 Account Setup: Within your new account, create a container and copy the container ID, located in the Workspace tab, which starts with 'GTM' in the top right.
STEP 3: LINK TAG MANAGER TO OLEEO ATS
🔧 Enable in Oleeo: Submit a support case on the customer portal, with the Google Tag Manager container ID provided, once within the configuration environment you can use Google’s Tag Assistant to troubleshoot the data flow.
STEP 4: CONFIGURE GOOGLE ANALYTICS IN TAG MANAGER
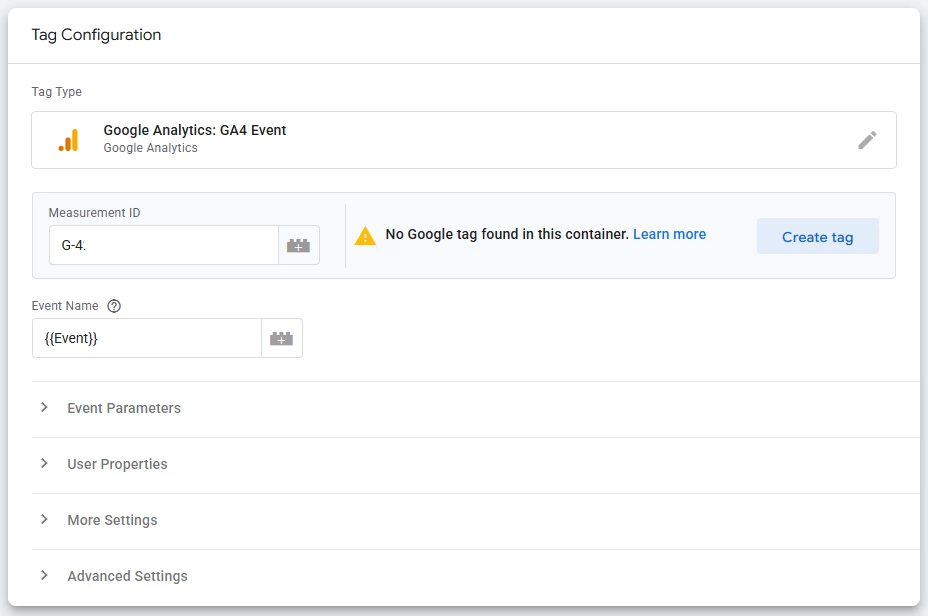
1. Create the GA4 Configuration Tag
This is the main tag that connects your site to GA4 and tracks page views.
-
New Tag: In your GTM container, click "Tags" and then "New".
-
Name Your Tag: Give it a clear name, like
Oleeo - Configuration - All Pages. -
Tag Configuration: Click "Tag Configuration" and choose the tag type "Google Analytics: GA4 Event".
-
Measurement ID: In the "Measurement ID" field, enter your GA4 Measurement ID (e.g.,
G-XXXXXXXXXX).-
Where to find it: In your GA4 property, go to Admin > Data Streams > select your web stream. The Measurement ID is at the top right.
-
-
Event Name: Ensure you provide the variables you would like to use for the event’s name.
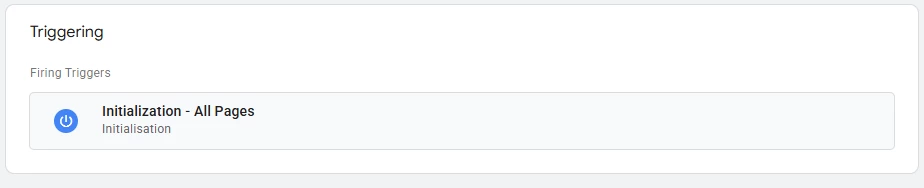
2. Set the Trigger
This tells the tag when to fire.
-
Triggering: Click inside the "Triggering" box.
-
Choose Trigger: Select the "Initialization - All Pages" trigger. This is the recommended trigger for the configuration tag as it ensures it fires before any other event tags.
3. Save & Preview
-
Save: Click "Save" in the top right corner.
-
Preview: It's highly recommended to use the "Preview" mode to test that your tag is firing correctly on your website before publishing.

Your basic connection is now established. Once published, this single tag will start sending page view data to your GA4 property.
STEP 5: TRACKING THE DATA
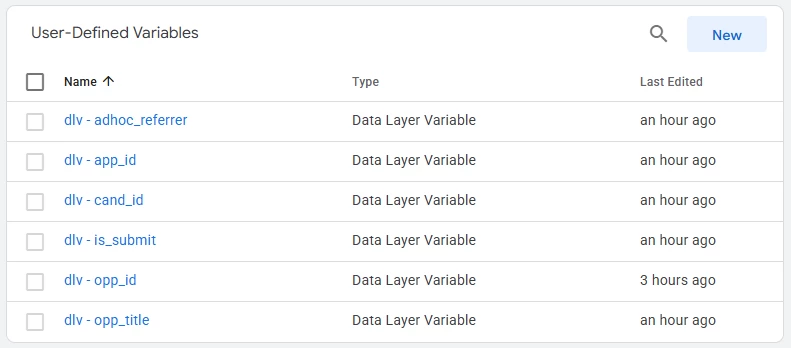
1. Create Data Layer Variables in GTM
First, you need to teach GTM how to read each piece of data.
-
In GTM, navigate to Variables.
-
Under "User-Defined Variables," click New.
-
Name the variable
dlv - opp_id(using the prefixdlvfor Data Layer Variable is a good practice). -
For "Variable Configuration," choose Data Layer Variable.
-
In the "Data Layer Variable Name" field, enter the key exactly:
opp_id. -
Click Save.
-
Repeat this process for every other key you want to track, creating a unique variable for each.
| Data Layer Key | GTM Variable Name to Create |
app_id | dlv - app_id |
opp_id | dlv - opp_id |
cand_id | dlv - cand_id |
opp_title | dlv - opp_title |
is_submit | dlv - is_submit |
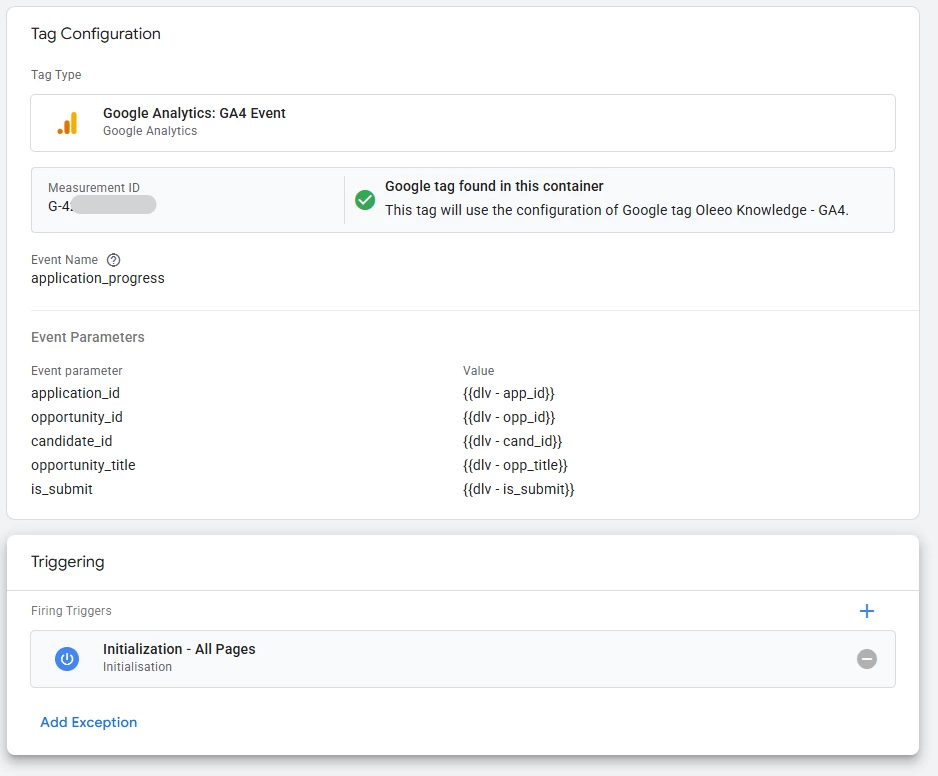
2. Create a GA4 Event Tag in GTM
This tag will bundle your variables and send them to GA4 during a specific event.
-
In GTM, navigate to Tags and click New.
-
Name the Tag: Call it something descriptive, like
GA4 Event - Opportunity View. -
Configure the Tag:
-
Click "Tag Configuration" and choose "Google Analytics: GA4 Event".
-
For "Configuration Tag," select the
GA4 - Configuration - All Pagestag you created in Step 4. -
For "Event Name," enter a custom name in
snake_case. Let's useapplication_progress.
-
-
Add Event Parameters:
-
Expand the Event Parameters section. This is where you attach the data.
-
Click Add Row for each variable. The "Parameter Name" is what GA4 will see, and the "Value" is the GTM variable that populates it.
-
| Parameter Name (for GA4) | Value (your GTM Variable) |
application_id | {{dlv - app_id}} |
opportunity_id | {{dlv - opp_id}} |
candidate_id | {{dlv - cand_id}} |
opportunity_title | {{dlv - opp_title}} |
is_submit | {{dlv - is_submit}} |
3. Create a Trigger for the Event
-
Set the Trigger:
-
Click inside the "Triggering" box.
-
Select the "Initialization - All Pages" trigger. This is the best practice as it ensures your GA4 configuration loads before any other tracking events.
-
-
Save the Tag: Click "Save" in the top right corner
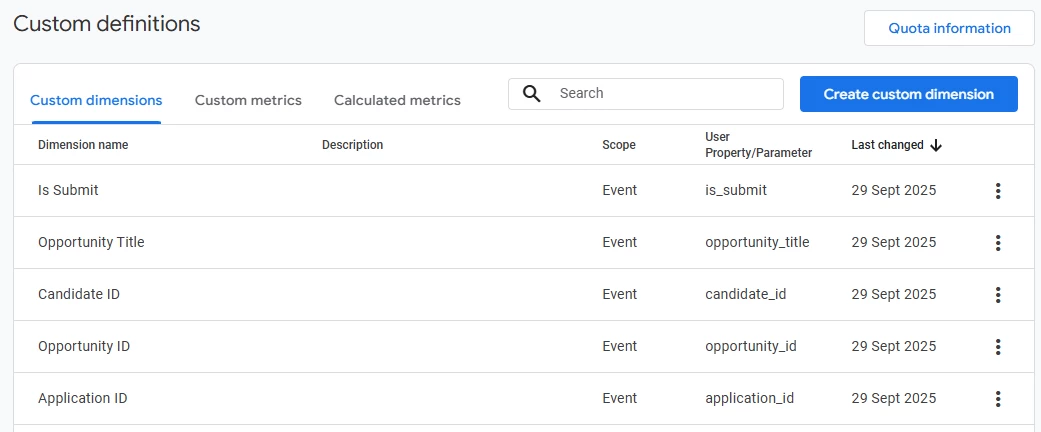
STEP 6: ACTIVATING YOUR DATA FOR REPORTING IN GA4
Just sending custom data isn't enough; you must register it in GA4 to use it in your reports. Do this after you have published your GTM changes and the event has fired at least once.
-
In your GA4 property, go to Admin.
-
In the "Data display" column, click on Custom definitions.
-
Click Create custom dimensions.
-
Create a new dimension for each of the event parameters you configured in GTM. The "Event parameter" field must be an exact match to the parameter name you set in the GA4 Event Tag.
| Dimension name (in GA4 reports) | Scope | Event parameter (must match GTM) |
| Application ID | Event | application_id |
| Opportunity ID | Event | opportunity_id |
| Candidate ID | Event | candidate_id |
| Opportunity Title | Event | opportunity_title |
| Is Submit | Event | is_submit |
Note: All these items are Custom Dimensions. Even though some are numbers (app_id), you will use them to group or filter your data, not to perform mathematical calculations (which is what Custom Metrics are for).
STEP 7: TESTING AND PUBLISHING
Before making your changes live, it is crucial to test them.
-
Preview: In GTM, click the "Preview" button in the top right. Enter your website URL and connect.
-
Test: Browse to a page on your site where the
application_progressevent should fire. -
Verify:
-
In the Tag Assistant (preview) window, you should see your
application_progressevent appear on the left-hand summary. -
Click on it, then click on your
GA4 Event - Opportunity Viewtag. -
Inspect the "Event Parameters" to ensure they are filled with the correct values from the data layer.
-
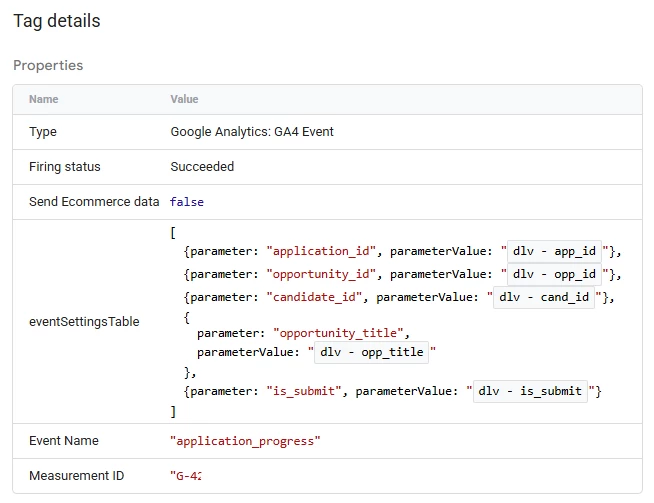
Successful Test
-
-
Publish: Once you have confirmed everything works as expected, go back to the GTM interface, click "Submit," and then "Publish" your container.
It can take 24-48 hours for the data from your new custom dimensions to be fully processed and available in GA4 reports, such as in the Explore section.
BENEFITS
- Capture detailed insights on candidate interactions and behaviour on your Oleeo ATS.
- Optimise your recruitment strategies with comprehensive data analytics.
- Gain a clearer understanding of your hiring funnel, identify bottlenecks, and improve overall efficiency.
- Seamlessly synchronise marketing and HR efforts for holistic growth and performance.
CONSIDERATIONS
- Ensure you have appropriate permissions to modify the Oleeo ATS backend settings.
- Double-check the accuracy of the Google Analytics ID and other configuration settings to avoid data tracking issues.
- Regularly review your tags and triggers to ensure they remain relevant and accurate.
COSTS
This feature utilises the standard Google Tag Manager and Google Analytics services, which are free to use.
NEXT STEPS
- Create a support case with your Google Tag Manager container ID.
- Test your setup by navigating through your Oleeo ATS site and checking real-time analytics in Google Analytics to ensure data is being captured correctly.
- Consult with your Customer Success Manager for further optimisation tips and advanced configurations.


